
VERITAS Storage Foundation 4.1 Cluster File System HP Serviceguard Storage Management Suite Extracts, December 2005


Chapter 2, Installing and Configuring
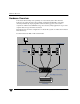
Creating a Dynamic (Shared) Disk Group
33
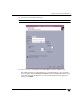
4. Enter a name for the dynamic disk group.
5. Check the Create Cluster Group checkbox.
6. Select Activation Mode and choose the mode from the displayed submenu.
Click OK.
7. Select the shared disks you want to include in the group. Make sure the disks you
want to include are in the right pane of the window, then click Next.
8. The next screen confirms the disks you have selected. Choose Yes to continue if the
the disk selection is correct. If you want to change your selected disks, click the No
button to go back to the previous screen.
Typically you add all the disks you want in the group at this point. You can add more
disks later with the Add Disk to Dynamic Disk Group command.
9. The next screen displays the specifications. Click Finish to create the shared disk
group.
Notes
The
New Dynamic Disk Group task requires a dynamic disk group name, the name of at
least one disk, and must be done on the CVM master node.
The dynamic disk group name must be unique.
The new dynamic disk group must contain at least one disk.
Only disks that are online and do not belong to a dynamic disk group can be used to create a
dynamic disk group.
The Volume Manager disk name must be unique within the dynamic disk group.
If multiple disks are specified in the Disk Device(s) field and only one disk name is specified
in Disk Name(s) field, VxVM appends numbers to the disk name so that each disk name is
unique within its dynamic disk group.