
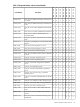
HP Serviceguard Storage Management Suite Version A.01.00 Release Notes, September 2008
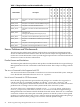
Installation of the HP Serviceguard Storage Management Suite bundle will automatically handle
dependencies on base VxFS and VxVM as well as between products in the bundles.
If the cluster configuration currently uses CVM 3.5 with Serviceguard refer to “Upgrading to
Serviceguard A.11.17 with CVM/CFS” for detailed upgrade scenarios and considerations. This
white paper is available on http://docs.hp.com.
Installation steps should be performed in the following order:
1. Install HP-UX 11i v2 or appropriate Operating Environment. HP-UX 11i v2 Update 2 (with
any required patches) is required for loading an HP Serviceguard Storage Management
Suite. Installation of T279xBA products require the installation of an HP-UX 11i v2 Mission
Critical Operating Environment (MCOE) containing Serviceguard version A.11.17 such as
MCOE December 2005.
If the system has base VERITAS Volume Manager version 3.5 already installed, the installation
process will overwrite that version of the product. If any version of VERITAS Cluster Volume
Manager (CVM) is installed, it must be removed before an HP Serviceguard Storage
Management Suite bundle can be installed.
2. Install the HP Serviceguard Storage Management Suite bundle from the HP-UX Application
Software media. Use the appropriate bundle product number in place of T27xxBA. This
installation will reboot the system once:
swinstall -x autoreboot=true -s <depot> T27xxBA
The default setting for installation of the bundle is “reinstall=false” this will preserve
any existing installation of the same version of a product.
3. After installation of software and one reboot is completed, apply any required product
patches. During this initial reboot, and until all required patches are applied, various startup
errors may be reported. Patches required for use of the Serviceguard Storage Management
Suite are available from http://www.hp.com/go/sgsms/patches. Follow any special
instructions included with the patches. Download the patches into a single file, extract the
contents, and create a single depot using instructions included with the download. Install
the patches using the option patch_match_target=true. This will install only the patches
from the depot that match the installed bundle.
4. After installation of any required product patches is completed run vxinstall. If
vxinstall has already been run on these systems, this step may be skipped. This procedure
completes initialization steps for the VERITAS software prompting for VERITAS licenses
(use default response - no), specification of default disk group, and the use enclosure-based
naming. For details on vxinstall, refer to VERITAS 4.1 Installation Guide.
5. Verify a successful installation. Use the appropriate bundle product number in place of
T27xxBA: swverify T27xxBA
6. List components installed with: swlist -l product
7. Repeat all steps for each node in the cluster.
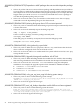
8. Refer to Managing Serviceguard for details on configuring the cluster. A high-level summary
of the steps involved in using the Cluster File System are:
a. Create and start a Serviceguard cluster without a package using Serviceguard Manager
or commands (cmquerycl, cmcheckconf, cmapplyconf, cmruncl).
b. Configure and start the CVM/CFS system multi-node package SG-CFS-pkg using the
cfscluster command.
c. Create the disk groups and volumes on the CVM master node with VERITAS Enterprise
Administrator or commands (vxdg, vxassist, newfs).
d. Add the CFS disk groups and file systems to the Serviceguard cluster. Use the cfsdgadm
command to create the disk group multi-node package (for example, SG-CFS-DG-1)
with a same node dependency on SG-CFS-pkg. Then use the cfsmntadm command
Compatibility Information and Installation Requirements 21