
Managing Serviceguard 14th Edition, June 2007


Building an HA Cluster Configuration
Preparing Your Systems
Chapter 5 213
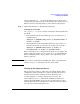
6. Verify that the mirrors were properly created.
lvlnboot -v
The output of this command is shown in a display like the following:
Boot Definitions for Volume Group /dev/vg00:
Physical Volumes belonging in Root Volume Group:
/dev/dsk/c4t5d0 (10/0.5.0) -- Boot Disk
/dev/dsk/c4t6d0 (10/0.6.0) -- Boot Disk
Boot: lvol1 on: /dev/dsk/c4t5d0
/dev/dsk/c4t6d0
Root: lvol3 on: /dev/dsk/c4t5d0
/dev/dsk/c4t6d0
Swap: lvol2 on: /dev/dsk/c4t5d0
/dev/dsk/c4t6d0
Dump: lvol2 on: /dev/dsk/c4t6d0, 0
Choosing Cluster Lock Disks
The following guidelines apply if you are using a lock disk. The cluster
lock disk is configured on an LVM volume group that is physically
connected to all cluster nodes. This volume group may also contain data
that is used by packages.
When you are using dual cluster lock disks, it is required that the default
I/O timeout values are used for the cluster lock physical volumes.
Changing the I/O timeout values for the cluster lock physical volumes
can prevent the nodes in the cluster from detecting a failed lock disk
within the allotted time period which can prevent cluster re-formations
from succeeding. To view the existing IO timeout value, run the following
command:
pvdisplay <lock device file name>
The I/O Timeout value should be displayed as “default.” To set the IO
Timeout back to the default value, run the command:
pvchange -t 0 <lock device file name>
The use of a dual cluster lock is only allowed with certain specific
configurations of hardware. Refer to the discussion in Chapter 3 on “Dual
Cluster Lock.” For instructions on setting up a lock disk, see “Specifying
a Lock Disk” on page 235.