
Managing Serviceguard 12th Edition, March 2006


Migrating from LVM to VxVM Data Storage
Customizing Packages for CVM 3.5 and 4.1
Appendix G464
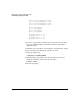
LV[0]="/dev/vx/dsk/dg01/lvol101"
LV[1]="/dev/vx/dsk/dg01/lvol102"
LV[2]="/dev/vx/dsk/dg02/lvol201"
LV[3]="/dev/vx/dsk/dg02/lvol202"
FS[0]="/mnt_dg0101"
FS[1]="/mnt_dg0102"
FS[2]="/mnt_dg0201"
FS[3]="/mnt_dg0202"
FS_MOUNT_OPT[0]="-o ro"
FS_MOUNT_OPT[1]="-o rw"
FS_MOUNT_OPT[2]="-o ro"
FS_MOUNT_OPT[3]="-o rw"
4. Be sure to copy from the old script any user-specific code that may
have been added, including environment variables and customer
defined functions.
5. Be sure to uncomment the appropriate CVM_ACTIVATION_CMD
statement to specify the kind of import you wish the package to
perform on the disk group.
6. Distribute the new package control scripts to all nodes in the cluster.
7. Enter each disk group into the package ASCII configuration file
immediately following the HALT_SCRIPT_TIMEOUT parameter. Add
one STORAGE_GROUP definition for each disk group. For the two disk
groups in the previous example, you would enter the following lines:
STORAGE_GROUP dg01
STORAGE_GROUP dg02
Then re-apply the package configuration:
# cmapplyconf -P
PackageName
.ascii
8. Test to make sure the disk group and data are intact.
9. Deport the disk group:
# vxdg deport
DiskGroupName
10. Start the cluster, if it is not already running:
# cmruncl
This will activate the special CVM package.