
Managing Serviceguard 11th Edition, Version A.11.16, Second Printing June 2004


Troubleshooting Your Cluster
Replacing Disks
Chapter 8 325
Replacing Disks
The procedure for replacing a faulty disk mechanism depends on the
type of disk configuration you are using. Separate descriptions are
provided for replacing an array mechanism and a disk in a high
availability enclosure.
Replacing a Faulty Array Mechanism
With any HA disk array configured in RAID 1 or RAID 5, refer to the
array’s documentation for instruction on how to replace a faulty
mechanism. After the replacement, the device itself automatically
rebuilds the missing data on the new disk. No LVM activity is needed.
This process is known as hot swapping the disk.
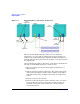
Replacing a Faulty Mechanism in an HA Enclosure
If you are using software mirroring with MirrorDisk/UX and the
mirrored disks are mounted in a high availability disk enclosure, you can
use the following steps to hot plug a disk mechanism:
1. Identify the physical volume name of the failed disk and the name of
the volume group in which it was configured. In the following
examples, the volume group name is shown as /dev/vg_sg01 and
the physical volume name is shown as /dev/dsk/c2t3d0. Substitute
the volume group and physical volume names that are correct for
your system.
2. Identify the names of any logical volumes that have extents defined
on the failed physical volume.
3. On the node on which the volume group is currently activated, use
the following command for each logical volume that has extents on the
failed physical volume:
# lvreduce -m 0 /dev/vg_sg01/lvolname /dev/dsk/c2t3d0
4. At this point, remove the failed disk and insert a new one. The new
disk will have the same HP-UX device name as the old one.
5. On the node from which you issued the lvreduce command, issue
the following command to restore the volume group configuration
data to the newly inserted disk: