
HP Serviceguard A.11.20- Managing Serviceguard Twentieth Edition, August 2011


NOTE: Because the CVM system multi-node package automatically starts up the Veritas processes,
do not edit /etc/llthosts, /etc/llttab, or /etc/gabtab.
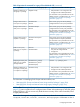
The cfscluster status command displays the status of the disk groups and mount point
packages created only for legacy CFS packages, not for modular CFS packages. To view the
status of modular CFS packages, use the cmviewcl –v –f line –p <package_name>
command.
Creating the Disk Groups
Initialize the disk group from the master node.
1. Find the master node using vxdctl or cfscluster status
.
2. Initialize a new disk group, or import an existing disk group, in shared mode, using the vxdg
command.
• For a new disk group use the init option:
vxdg -s init logdata c4t0d6
• For an existing disk group, use the import option:
vxdg -C -s import logdata
3. Verify the disk group. The state should be enabled and shared:
vxdg list
NAME STATE ID
logdata enabled, shared, cds 11192287592.39.ftsys9
Creating the Disk Group Cluster Packages
1. Use the cfsdgadm command to create the package SG-CFS-DG-ID#, where ID# is an
automatically incremented number, assigned by Serviceguard when it creates the package.
In this example, the SG-CFS-DG-ID# package will be generated to control the disk group
logdata, in shared write mode:
cfsdgadm add logdata all=sw
2. You can verify the package creation with the cmviewcl command, or with the cfsdgadm
display command. An example of cfsdgadm output is shown below:
cfsdgadm display
Node Name : ftsys9 (MASTER)
DISK GROUP ACTIVATION MODE
logdata off (sw)
Node Name : ftsys10
DISK GROUP ACTIVATION MODE
logdata off (sw)
3. Activate the disk group and start up the package:
cfsdgadm activate logdata
4. To verify, you can use cfsdgadm or cmviewcl. This example shows the cfsdgadm output:
cfsdgadm display -v logdata
NODE NAME ACTIVATION MODE
ftsys9 sw (sw)
MOUNT POINT SHARED VOLUME TYPE
Configuring the Cluster 203