
Managing Serviceguard Extension for SAP Version B.05.10, December 2012

Verify that the symbolic links listed below in directory
/var/spool/sql
exist on both cluster
nodes
.
dbspeed -> /sapdb/data/dbspeed
diag -> /sapdb/data/diag
fifo -> /sapdb/data/fifo
ini
ipc -> /sapdb/data/ipc
pid -> /sapdb/data/pid
pipe -> /sapdb/data/pipe
ppid -> /sapdb/data/ppid
liveCache Installation Step: LC070
Make sure
/var/spool/sql
exists as a directory on the backup node
.
/usr/spool must be a symbolic link to /var/spool.
liveCache Installation Step: LC080
On the backup node, create a directory as future mountpoint for all relevant directories from the
table of section that refers to the layout option you chose
.
Option 1:
mkdir /sapdb
Option 2:
mkdir -p /sapdb/data
mkdir /sapdb/<LCSID>
Option 3:
mkdir -p /sapdb/<LCSID>
Cluster Node Configuration
liveCache Installation Step: LC100
Repeat the steps in this section for each node of the cluster
.
liveCache Installation Step: LC110
Add all relocatable IP address information to
/etc/hosts
. Remember to add the heartbeat IP
addresses
.
liveCache Installation Step: LC120
If you use DNS:
Configure /etc/nsswitch.conf to avoid problems.
Example:
hosts: files[NOTFOUND=continue UNAVAIL=continue \
TRYAGAIN=continue]dns
HP-UX Setup for Option 4
This section describes how to install a hot standby instance on the secondary node.
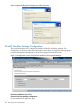
hot standby Installation Step: LC143
The hot standby instance of storage option 4 can be installed with the installer routine that comes
on the SAP liveCache media
.
There is no special option for a hot standby provided by SAP yet, but installation is very
straight-forward. "Install" or "patch" the master instance on the standby host. This creates local
copies of all required directories, users, services and files. log files and data files should not be
defined in this step.
hot standby Installation Step: LC145
126 SAP Supply Chain Management