
Managing Serviceguard Extension for SAP, December 2007
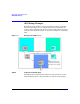

SAP Supply Chain Management
General Serviceguard Setup Changes
Chapter 4 235
General Serviceguard Setup Changes
Dependent from the storage option chosen, the globally available
directories need to be added to different existing Serviceguard packages.
The following installation steps require that the system has already been
configured to use the automounter feature. If this is not the case, refer to
installation steps IS730 to IS770 found in Chapter 3 of this manual.
GS250 liveCache Installation Step:
For option 1:
A logical volume for /sapdb/programs should already exist within the
NFS package part of the dbci<APOSID> package. It contains the SAPDB
client libraries. In case of a two-package installation for APO, the logical
volume is part of the NFS package part of the db<APOSID> package.
1. Copy the content of /sapdb/programs from the liveCache primary
node to this logical volume. It should be a superset of the files that
already exist.
2. Make sure /sapdb/programs exists as empty mountpoint on all
hosts of the liveCache and APO packages.
3. Add the following entry to /etc/auto.direct. on all liveCache
package nodes: /sapdb/programs
<relocdbci_s>:/sapdb/programs.
For option 2:
1. Add a shared logical volume for /export/sapdb/programs to the
global NFS package (sapnfs).
2. Copy the content of /sapdb/programs from the liveCache primary
node to this logical volume.
3. Make sure /sapdb/programs exists as empty mountpoint on all
hosts of the liveCache package. Also make sure
/export/sapdb/programs exists as empty mountpoint on all hosts of
the sapnfs package.
4. Add the following entry to /etc/auto.direct. on all hosts of the
liveCache package:
/sapdb/programs<relocsapnfs_s>:/export/sapdb/programs