
Managing Serviceguard Extension for SAP, December 2007

SAP Supply Chain Management
HP-UX Setup for Options 1, 2 and 3
Chapter 4218
HP-UX Setup for Options 1, 2 and 3
This section describes how to synchronize and configure the HP-UX
installations on all cluster nodes in order to allow that the same
liveCache instance is able to run on any of these nodes. This section does
not apply to hot standby systems, since they never perform any instance
failover.
For systems with hot standby this entire HP-UX setup section can be
skipped.
Clustered Node Synchronization
1. Repeat the steps in this section for each node of the cluster that is
different from the primary. .
2. Logon as root to the primary host and prepare a logon for each of its
backup hosts.
LC030 liveCache Installation Step:
Synchronize the /etc/group and /etc/passwd files. The liveCache
installation has created a <lcsid>adm user belonging to the sapsys
group. Make sure the user and group exist on all nodes and that UID and
GID are consistent across the nodes.
LC040 liveCache Installation Step:
Synchronize the sql<nn> entries from the /etc/services file between
the nodes to match the entries on the primary node. Usually you will find
service entries for sql6 and sql30.
LC050 liveCache Installation Step:
Change the HP-UX kernel on the backup nodes to meet the SAP
liveCache requirements as specified in the SAP liveCache installation
documents.
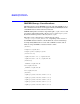
LC060 liveCache Installation Step:
1. Copy the content of the <lcsid>adm home directory to the backup
node. This is a local directory on each node.
2. Rename the environment scripts on the secondary nodes. Some of the
environment scripts may not exist. For example: