
Using Serviceguard Extension for RAC Version A.11.20 - (August 2011)

1. On ftsys9, copy the mapping of the volume group to a specified file.
# vgexport -s -p -m /tmp/vg_rac.map /dev/vg_rac
2. Still on ftsys9, copy the map file to ftsys10 (and to additional nodes as necessary.)
# rcp /tmp/vg_rac.map ftsys10:/tmp/vg_rac.map
3. On ftsys10 (and other nodes, as necessary), create the volume group directory and the
control file named group.
# mkdir /dev/vg_rac
# mknod /dev/vg_rac/group c 64 0xhh0000
For the group file, the major number is always 64, and the hexadecimal minor number has
the form
0xhh0000
where hh must be unique to the volume group you are creating. If possible, use the same
number as on ftsys9. Use the following command to display a list of existing volume groups:
# ls -l /dev/*/group
4. Import the volume group data using the map file from node ftsys9. On node ftsys10 (and
other nodes, as necessary), enter:
# vgimport -s -m /tmp/vg_rac.map /dev/vg_rac
Installing Oracle Real Application Clusters
NOTE: Some versions of Oracle RAC requires installation of additional software. Refer to your
version of Oracle for specific requirements.
Before installing the Oracle Real Application Cluster software, make sure the storage cluster is
running. Login as the oracle user on one node and then use the Oracle installer to install Oracle
software and to build the correct Oracle runtime executables. When executables are installed to
a local file system on each node, the Oracle installer copies the executables to the other nodes in
the cluster.
For details on Oracle installation, refer to the Oracle installation documentation. As part of this
installation, the Oracle installer installs the executables and optionally, the Oracle installer can
build an Oracle demo database on the primary node. The demo database files can be the character
(raw) device files names for the logical volumes create earlier.
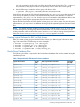
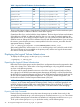
For a demo database on SLVM or CVM, create logical volumes as shown in Table 1: “Required
Oracle File Names for Demo Database ”. As the installer prompts for the database file names,
either the pathnames of the raw logical volumes instead of using the defaults. If you do not wish
to install the demo database, select install software only.
Creating a Storage Infrastructure with CFS
In addition to configuring the cluster, you create the appropriate logical volume infrastructure to
provide access to data from different nodes. This is done with Logical Volume Manager (LVM) or
Veritas Cluster Volume Manager (CVM).
You can also use a mixture of volume types, depending on your needs. LVM configuration is done
before cluster configuration, and CVM configuration is done after cluster configuration. (Note for
HP-UX releases that support Veritas CFS and CVM. See “About Veritas CFS and CVM from
Symantec” (page 15))
This section has information about configuring a cluster that uses the Veritas cluster file system
(CFS) with Veritas Cluster Volume Manager (CVM) 5.x or later. The next section (“Creating a
Storage Infrastructure with CVM” (page 52)) has information about configuring the Veritas Cluster
Volume Manager (CVM) with other filesystems, not CFS.
Installing Oracle Real Application Clusters 47