
Using Serviceguard Extension for RAC, 9th Edition, September 2010

IMPORTANT: Creating a rootdg disk group is only necessary the first time you use the
Volume Manager. CVM 5.x or later does not require a rootdg.
2. Create the cluster file.
# cd /etc/cmcluster
# cmquerycl -C clm.asc -n ever3a -n ever3b
Edit cluster file.
3. Create the cluster.
# cmapplyconf -C clm.asc
4. Start the cluster.
# cmruncl
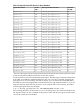
# cmviewcl
The following output will be displayed:
CLUSTER STATUS
ever3_cluster up
NODE STATUS STATE
ever3a up running
ever3b up running
5. Configure the Cluster Volume Manager (CVM).
Configure the system multi-node package, SG-CFS-pkg, to configure and start the CVM/CFS
stack. Unlike VxVM-CVM-pkg, the SG-CFS-pkg does not restrict heartbeat subnets to a
single subnet, and supports multiple subnets.
# cfscluster config -s
The following output will be displayed:
CVM is now configured Starting CVM
When CVM starts up, it selects a master node, which is the node from which you must issue
the disk group configuration commands. To determine the master node, issue the following
command from each node in the cluster:
# vxdctl -c mode
The following output will be displayed:
mode: enabled: cluster active SLAVEmaster: ever3b
or
mode: enabled: cluster active MASTERmaster: ever3b
6. Converting disk from LVM to CVM.
Use the vxvmconvert utility to convert LVM volume groups into CVM disk groups. Before
you can do this, the volume group must be deactivated—any package that uses the volume
group must be halted. This procedure is described in the latest edition of the Managing
Serviceguard user guide.
7. Initializing disks for CVM/CFS.
You need to initialize the physical disks that will be employed in CVM disk groups. If a
physical disk has been previously used with LVM, you should use the pvremove command
to delete the LVM header data from all the disks in the volume group (this is not necessary
if you have not previously used the disk with LVM).
90 Serviceguard Configuration for Oracle 9i RAC