
Using Serviceguard Extension for RAC, 9th Edition, September 2010
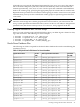

Table 2-1 Required Oracle File Names for Demo Database (continued)
Oracle File
Size (MB)*
Raw Logical Volume Path NameLV Size
(MB)
Logical Volume Name
5
/dev/vg_ops/rpwdfile.ora
5
pwdfile.ora
500
/dev/vg_ops/ropsundotbs1.log
508
opsundotbs1.dbf
500
/dev/vg_ops/ropsundotbs2.log
508
opsundotbs2.dbf
160
/dev/vg_ops/ropsexample1.dbf
168
example1.dbf
The size of the logical volume is larger than the Oracle file size because Oracle needs extra space
to allocate a header in addition to the file's actual data capacity.
Create these files if you wish to build the demo database. The three logical volumes at the bottom
of the table are included as additional data files, which you can create as needed, supplying the
appropriate sizes. If your naming conventions require, you can include the Oracle SID and/or
the database name to distinguish files for different instances and different databases. If you are
using the ORACLE_BASE directory structure, create symbolic links to the ORACLE_BASE files
from the appropriate directory. Example:
# ln -s /dev/vg_ops/ropsctl1.ctl/u01/ORACLE/db001/ctrl01_1.ctl
After creating these files, set the owner to oracle and the group to dba with a file mode of 660.
The logical volumes are now available on the primary node, and the raw logical volume names
can now be used by the Oracle DBA.
Displaying the Logical Volume Infrastructure
To display the volume group, use the vgdisplay command:
# vgdisplay -v /dev/vg_ops
Exporting the Logical Volume Infrastructure
Before the Oracle volume groups can be shared, their configuration data must be exported to
other nodes in the cluster. This is done either in Serviceguard Manager or by using HP-UX
commands, as shown in the following sections.
NOTE: Serviceguard Manager is the graphical user interface for Serviceguard. It is available
as a “plug-in” to the System Management Homepage (SMH). SMH is a web-based graphical
user interface (GUI) that replaces SAM as the system administration GUI as of HP-UX 11i v3
(but, you can run the SAM terminal interface). See “Using SAM” in the latest edition of the
Managing Serviceguard user’s guide.
Exporting with LVM Commands
Use the following commands to set up the same volume group on another cluster node. In this
example, the commands set up a new volume group on a system known as ftsys10. This
volume group holds the same physical volume that was created on a configuration node known
as ftsys9.
To set up the volume group on ftsys10 (and other nodes), use the following steps:
1. On ftsys9, copy the mapping of the volume group to a specified file.
# vgexport -s -p -m /tmp/vg_ops.map /dev/vg_ops
2. Still on ftsys9, copy the map file to ftsys10 (and to additional nodes as necessary.)
# rcp /tmp/vg_ops.map ftsys10:/tmp/vg_ops.map
48 Serviceguard Configuration for Oracle 10g, 11gR1, or 11gR2 RAC