
Using Serviceguard Extension for RAC, 7th Edition, September 2008


when a mirror was lost from a mirrored volume group being used in a non-RAC package. Refer
to the manual Using the Event Monitoring Service (B7609-90022) for additional information.
Using EMS Hardware Monitors
A set of hardware monitors is available for monitoring and reporting on memory, CPU, and
many other system values. Refer to the EMS Hardware Monitors User’s Guide (B6191-90015) for
additional information.
Adding Disk Hardware
As your system expands, you may need to add disk hardware. This also means modifying the
logical volume structure. Use the following general procedure:
1. Halt packages.
2. Ensure that the Oracle database is not active on either node.
3. Deactivate and mark as unshareable any shared volume groups.
4. Halt the cluster.
5. Deactivate automatic cluster startup.
6. Shutdown and power off system before installing new hardware.
7. Install the new disk hardware with connections on all nodes.
8. Reboot all nodes.
9. On the configuration node, add the new physical volumes to existing volume groups, or
create new volume groups as needed.
10. Start up the cluster.
11. Make the volume groups shareable, then import each shareable volume group onto the other
nodes in the cluster.
12. Activate the volume groups in shared mode on all nodes.
13. Start up the Oracle RAC instances on all nodes.
14. Activate automatic cluster startup.
NOTE: As you add new disks to the system, update the planning worksheets (described in
Appendix B: “Blank Planning Worksheets”, so as to record the exact configuration you are using.
Replacing Disks
The procedure for replacing a faulty disk mechanism depends on the type of disk configuration
you are using and on the type of Volume Manager software. For a description of replacement
procedures using VERITAS VxVM or CVM, refer to the chapter on “Administering
Hot-Relocation” in the VERITAS Volume Manager Administrator’s Guide. Additional information
is found in the VERITAS Volume Manager Troubleshooting Guide.
The following paragraphs describe how to replace disks that are configured with LVM. Separate
descriptions are provided for replacing a disk in an array and replacing a disk in a high availability
enclosure.
For more information, see When Good Disks Go Bad, posted at http://docs.hp.com
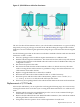
Replacing a Mechanism in a Disk Array Configured with LVM
With any HA disk array configured in RAID 1 or RAID 5, refer to the array’s documentation for
instruction on how to replace a faulty mechanism. After the replacement, the device itself
automatically rebuilds the missing data on the new disk. No LVM activity is needed. This process
is known as hot swapping the disk.
Adding Disk Hardware 121