
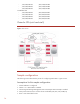
Sample Configuration with HP Serviceguard Extension for RAG and Oracle Real Application Clusters 11g release 2 using Cluster File System

18
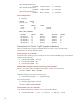
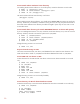
/dev/vx/dsk/cfsdg1/vol1
10485760 36455 9796231 0% /cfs/mnt1
/dev/vx/dsk/cfsdg1/vol2
10485760 36455 9796231 0% /cfs/mnt2
/dev/vx/dsk/cfsdg1/vol3
1048576 34142 951039 3% /cfs/mnt3
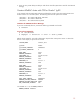
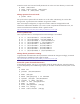
View configuration
# cmviewcl
CLUSTER STATUS
cluster_ccia up
NODE STATUS STATE
ccia1 up running
ccia2 up running
MULTI_NODE_PACKAGES
PACKAGE STATUS STATE AUTO_RUN SYSTEM
SG-CFS-pkg up running enabled yes
SG-CFS-DG-1 up running enabled no
SG-CFS-MP-1 up running enabled no
SG-CFS-MP-2 up running enabled no
SG-CFS-MP-3 up running enabled no
Prerequisites for Oracle 11g R2 (sample installation)
These are sample steps to prepare a SGeRAC cluster for Oracle 11g R2. Consult Oracle
documentation for Oracle installation details.
Create groups on each node
Create the Oracle Inventory group (if one does not exist), create the OSDBA group, and create the
Operator Group (optional).
# /usr/sbin/groupadd oinstall
# /usr/sbin/groupadd dba
# /usr/sbin/groupadd oper
Add HP-UX privileges to Oracle Inventory group members
Edit the
/etc/privgroup file and add the following line, if it does not already exist:
oinstall RTPRIO MLOCK RTSCHED
Add these privileges to the Oracle Inventory group:
# /usr/sbin/setprivgrp –f /etc/privgroup
Verify these privileges:
# /usr/bin/getprivgrp oinstall
oinstall: RTPRIO MLOCK RTSCHED
Create Oracle user on each node
In this sample configuration, the Oracle user owns all Oracle software.
# /usr/sbin/useradd –u 203 –g oinstall –G dba,oper oracle