Oracle Database 11g Release 2 Real Application Clusters with SLVM/RAW on HP-UX Installation Cookbook Technical white paper Table of contents Executive Summary .............................................................................................................................. 2 Introduction......................................................................................................................................... 2 Audience ..............................................................
Executive Summary Oracle Real Application Cluster 11g Release 2 can be configured with various storage options. The storage option SLVM/RAW is one of them. This storage option provides many benefits to users. It provides multipathing; extra level of protection against inadvertent overwrites from nodes inside/outside the cluster, fast database recovery time and fast cluster reformation time. This white paper describes Oracle Real Application Cluster 11g Release 2 and SGeRAC A.11.
Audience This white paper intended for readers who wish to install/configure Oracle Real Application Clusters 11g Release 2 with SLVM/RAW on HP-UX. General System Installation Requirements Hardware Requirements • At least 4 GB of physical RAM.
• If you want to use Oracle on RAW devices and Async I/O is not configured, then – Create the /dev/async character device # /sbin/mknod /dev/async c 101 0x0 # chown oracle:dba /dev/async # chmod 660 /dev/async – Configure the async driver in the kernel using SAM or HP SMS. – Set HP-UX kernel parameter max_async_ports using SAM. max_async_ports limits the maximum number of processes that can concurrently use /dev/async. Set this parameter to the sum of “processes” from init.
• Cluster SCAN address that will be used by all clients connecting to the cluster. It should be on same subnet as of public interface. It is a domain name registered to at least one and up to three IP addresses. It changes the need to change clients when nodes are added to or removed from the cluster. It should be registered on Domain Name Server (DNS) or configured in /etc/host of all nodes of cluster.
– Crossover cables are not supported for the cluster interconnect; switch is mandatory for production implementation, even for only 2 nodes architecture. – Please note that Oracle Clusterware Heartbeat timeout default (“misscount”) is 30 seconds for clusters without Serviceguard and 600 for clusters with Serviceguard. This ensures that Serviceguard will be first to recognize any failures and to initiate cluster reformation activities.
Kernel Parameter Settings Verify that the kernel parameters shown in the following table (Table 1) are set either to the value shown, or to values greater than or equal to the recommended value shown. If the current value for any parameter is higher than the value listed in this table, do not change the value of that parameter.
Create the Oracle User • Log in as the root user • Create database groups on each node. The group ids must be unique. The id used here are just examples, you can use any group id not used on any of the cluster nodes. – The OSDBA group, typically dba: bike/cycle# /usr/sbin/groupadd -g 201 dba – The optional ORAINVENTORY group, typically oinstall; this group owns the Oracle inventory, which is a catalog of all Oracle software installed on the system.
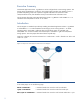
Oracle RAC 11g Cluster Preparation Steps In this section, we provide examples of command sequences that can be used to prepare the cluster. All examples demonstrate how storage is configured using new Next Generation Mass storage Stack introduced with HP-UX 11.31. This new I/O stack provides native multi-pathing and load balancing, as well as agile and persistent addressing. Using the agile address, HP-UX will automatically and transparently use the redundant path for the LUN in the background.
• Disks need to be properly initialized before being added into volume groups.
– Import the volume group: cycle# vgimport –v –s -N –m /tmp/scripts/mapfile /dev/vg_rac Note: the -N option is for HP-UX 11.31 agile addressing Note: The minor number has to be the same as on the other node. – Check to see if devices are imported: cycle# strings /etc/lvmtab • Disable automatic volume group activation on all cluster nodes by setting AUTO_VG_ACTIVATE to 0 in file /etc/lvmrc. This ensures that shared volume group vg_rac is not automatically activated at system boot time.
• Create the binary configuration file and distribute the cluster configuration to all the nodes in the cluster: bike# cmapplyconf -v -C rac.asc Note: the cluster is not started until you run cmrunnode on each node or cmruncl. • De-activate the lock disk on the configuration node after cmapplyconf bike# vgchange -a n /dev/vg_rac • Start the cluster and view it to be sure it’s up and running. See the next section for instructions on starting and stopping the cluster.
Prepare HP-UX Systems for Oracle software installation On HP-UX, most processes use a time-sharing scheduling policy. Time sharing can have detrimental effects on Oracle performance by descheduling an Oracle process during critical operations, for example, when it is holding a latch. HP-UX has a modified scheduling policy, referred to as SCHED_NOAGE, that specifically addresses this issue.
• Set Oracle environment variables by adding an entry similar to the following example to each user startup .profile file for the Bourne or Korn shells, or .login file for the C shell.
Install Oracle Clusterware 11gR2 This section describes the procedures for using the Oracle Grid Infrastructure (OGI) to install Oracle Clusterware. 1 Login as Oracle User and set the ORACLE_HOME environment variable to the Oracle Clusterware Home directory. Then start the Oracle Grid Infrastructure Installer from Clusterware mount directory by issuing the command bike/cycle$ export ORACLE_HOME=/opt/oracle/CRS_R2 bike/cycle$ ./runInstaller & Ensure that you have the DISPLAY set.
3 Select Product Language and click NEXT. 4 Here you can specify operating system groups. You will get warning message if you select same OS group for OSDBA, OSOPER, and OSASM.
5 Specify Installation Location. 6 Specify Inventory Directory.
7 Here the installer verifies that your environment meets all minimum requirements for installing and configuring Oracle Clusterware. 8 Ensure that you don’t get any warning or error during Prerequisite check. After Prerequisite check click NEXT.
9 Verify the details about the installation that appear on the Summary page and click FINISH or click Back to revise your installation.
11 12 Open a terminal window of both nodes (bike and cycle), Log in as “oracle”, Open file /var/opt/product/crs_r2/crs/install/crsconfig_params and edit following fields.
15 Execute /var/opt/product/crs_r2/crs/install/rootcrs.pl on both node (bike and cycle) again. /var/opt/product/crs_r2/perl/bin/perl -I/var/opt/product/crs_r2/perl/lib -I/var/opt/product/crs_r2/crs/install /var/opt/product/crs_r2/crs/install/rootcrs.pl 16 Execute following command from clusterware mount dir on both node (bike and cycle). .
Install and Create Oracle Database RAC 11gR2 This part describes phase two of the installation procedures for installing the Oracle Database 11g with Real Application Clusters (RAC). 1 Login as Oracle User and set the ORACLE_HOME environment variable to the Oracle Home directory. Then start the Oracle Database Installer by issuing following command from RAC database mount dir. $ export ORACLE_HOME= /var/opt/oracle/rac_r2 $ .
3 Select “Install database software only” as Installation option and click NEXT. 4 Select “Real Application Clusters database installation” and click NEXT.
5 Select Product Language and click NEXT. 6 Select “Enterprise Edition” and click NEXT.
7 Specify Installation Location and click NEXT. 8 Specify OS groups and click NEXT.
9 Now you will get prerequisite check screen. 10 Ensure that you don’t get any warning or error during Prerequisite check. After Prerequisite check click NEXT. 11 Verify the details about the installation that appear on the Summary page and click FINISH or click Back to revise your installation.
12 Now you will get following Screen.
14 You should get final screen now. Click CLOSE. 15 Execute netca from ORA_CRS_HOME (/var/opt/product/crs_r2) to configure listener. Select Listener configuration and click NEXT.
16 Select Add and click NEXT. 17 Specify Listener Name and click NEXT.
18 Select Protocol and click NEXT. 19 Specify Port number and click NEXT. It is recommend to use standard Port number.
20 Select NO and click NEXT. 21 You should get following screen now. Click NEXT.
22 Click Finish on following Screen. 23 Execute following commands to configure cluster scan and cluster scan listener. a) bike$ srvctl add scan -n SCAN1 # Here SCAN1 is scan name. b) bike$ srvctl start scan # Start Cluster Scan. c) bike$ srvctl add scan_listener -l LISTENER_SCAN -s -p TCP:1521 # Add Cluster Scan Listener. d) bike$ srvctl start scan_listener # Start Cluster Scan Listener. Verify status of Cluster Scan listener.
25 Create pfile init.ora in $ORACLE_BASE/admin/slvmdb/scripts with following contents. ########################################### # Archive ########################################### log_archive_format=%t_%s_%r.
slvmdb1.instance_number=1 slvmdb2.instance_number=2 slvmdb2.thread=2 slvmdb1.thread=1 slvmdb2.undo_tablespace=UNDOTBS2 slvmdb1.undo_tablespace=UNDOTBS1 26 Create pfile initslvmdbTemp.ora in $ORACLE_BASE/admin/slvmdb/scripts with following contents. ########################################### # Archive ########################################### log_archive_format=%t_%s_%r.
########################################### # Shared Server ########################################### #dispatchers=" ( PROTOCOL = TCP ) ( SERVICE = slvmdbXDB )" _no_recovery_through_resetlogs=true slvmdb1.instance_number=1 slvmdb2.instance_number=2 slvmdb2.thread=2 slvmdb1.thread=1 slvmdb2.undo_tablespace=UNDOTBS2 slvmdb1.undo_tablespace=UNDOTBS1 27 Export Oracle SID with Database instance name and include Oracle HOME bin dir in PATH.
'/dev/vg_rac/rorcl_system_1300m', 0, 'SYSTEM'); dbms_backup_restore.restoreDataFileTo(2, '/dev/vg_rac/rorcl_sysaux_1300m', 0, 'SYSAUX'); dbms_backup_restore.restoreDataFileTo(3, '/dev/vg_rac/rorcl_undotbs1_512m', 0, 'UNDOTBS1'); dbms_backup_restore.restoreDataFileTo(4, '/dev/vg_rac/rorcl_users_128m', 0, 'USERS'); dbms_output.put_line(' Restoring ... '); dbms_backup_restore.restoreBackupPiece('/var/opt/oracle/rac_r2/ assistants/dbca/templates/Seed_Database.dfb', done); if done then bms_output.
LOGFILE GROUP 1 ('/dev/vg_rac/rorcl_redo1_1_128m') SIZE 51200K, GROUP 2 ('/dev/vg_rac/rorcl_redo1_2_128m') SIZE 51200K RESETLOGS; • alter system enable restricted session; • alter database "slvmdb" open resetlogs; • exec dbms_service.delete_service('seeddata'); • exec dbms_service.delete_service('seeddataXDB'); • alter database rename global_name to "slvmdb.ind.hp.
34 Execute following commands to lock account. • SET VERIFY OFF • set echo on • BEGIN FOR item IN ( SELECT USERNAME FROM DBA_USERS WHERE ACCOUNT_STATUS IN ('OPEN', 'LOCKED', 'EXPIRED') AND USERNAME NOT IN ('SYS','SYSTEM') ) LOOP dbms_output.put_line('Locking and Expiring: ' || item.USERNAME); execute immediate 'alter user ' || sys.dbms_assert.enquote_name( sys.dbms_assert.schema_name( item.
36 Exit from SQL Prompt. Execute Following command to see the status of the Database. • bike$ crsctl status resource ora.slvmdb.db Output should be NAME=ora.slvmdb.db TYPE=ora.database.type TARGET=ONLINE , ONLINE STATE=ONLINE on bike, ONLINE on cycle 37 Congrats!! You have successfully completed Oracle Real Application Cluster 11g Release 2 installation with SLVM/RAW. Reference • http://www.oracle.com/pls/db112/portal.portal_db?selected=11&frame=#hpux_installation_guides • http://download.oracle.
Share with colleagues © Copyright 2010 Hewlett-Packard Development Company, L.P. The information contained herein is subject to change without notice. The only warranties for HP products and services are set forth in the express warranty statements accompanying such products and services. Nothing herein should be construed as constituting an additional warranty. HP shall not be liable for technical or editorial errors or omissions contained herein.