
- Hewlett-Packard All in One Printer User Manual

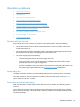

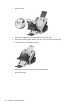
Table Of Contents
- Product basics
- Control panel
- Supported utilities for Windows
- Configure the product
- Load originals
- Scan and send documents
- Manage and maintain the product
- Solve problems
- Error codes
- Basic troubleshooting tips
- Restore factory settings
- Interpret control-panel status lights
- Control-panel message types
- Control-panel messages
- Installation problems
- Initialization or hardware problems
- Operation problems
- Product will not turn on
- Lamp stays on
- Scan does not start right away
- Only one side of a two-sided page scans
- Scanned pages are missing at the scan destination
- Scanned pages are out of order at the scan destination
- Optimize scanning and task speeds
- The scan is completely black or completely white
- Scanned images are not straight
- Scan files are too large
- Paper path problems
- Paper jamming, skewing, misfeeds, or multiple-page feeds
- Scanning fragile originals
- Paper does not feed correctly
- Originals are curling up in the output tray
- The bottom of the scanned image is cut off
- The scanned images have streaks or scratches
- An item loaded in the document feeder jams repeatedly
- Clear jams from the paper path
- Solve e-mail problems
- Solve network problems
- Contact HP Support
- Supplies and accessories
- Service and support
- Product specifications
- Regulatory information
- Index
A problem with the hardware might exist. Follow this procedure to test the product:
1. Ensure that the power supply is securely connected between the product and a live electrical
outlet or surge protector. Check that the green LED on the power supply case is on to verify that
the power supply is functional.
2. If the power supply is connected to a surge protector, ensure that the surge protector is plugged
into an outlet and turned on.
3. Press the Power button.
4. When prompted, touch Shutdown Now, and then touch OK to turn off the product.
5. Wait 30 seconds, and then press the Power button to turn on the product.
6. Try the scan again.
Originals are curling up in the output tray
Under dry conditions, lightweight originals such as those printed on carbonless copy paper may curl
in the output tray. To minimize curl, flatten curled edges on the originals before placing them in the
document feeder. If you cannot flatten curled edges, make sure the curled edges are facing down
when you place the originals in the document feeder.
The bottom of the scanned image is cut off
By default, the product can scan media that is up to 864 mm (34 in) long. For longer pages, the end
of the document is not included in the scanned image.
Make sure the job option you select reflects the page size of the document you are scanning.
The scanned images have streaks or scratches
After each step, try another scan to see if the streaks or scratches are still apparent. If so, then try the
next step.
● Check that the originals are clean and unwrinkled.
● Use a cleaning cloth in the paper path.
● Clean the glass strips inside the document feeder.
●
Clean the rollers.
An item loaded in the document feeder jams repeatedly
●
The item might not meet the guidelines for acceptable originals.
●
The item might have something on it, such as staples or self-adhesive notes on the original that
must be removed.
●
Make sure the paper guides touch the edges of the original.
Clear jams from the paper path
To clear a paper jam:
1. Remove originals from the document feeder.
Paper path problems 91