
HP RIP Software - User Guide


Creating a Color Profile 4-19
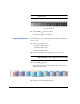
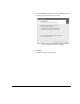
Read the patches with an external device or wait while the printer’s
camera reads them. Refer to the manual for your external device
for instructions. As each strip or patch is read, its color is displayed.
• To delete and re-read the last strip or individual patch, click it,
then click the Replace button.
• To save the linearization readings and proceed, click the
Submit ( ) button.
When you click the Submit button, the Profile Settings screen
appears.
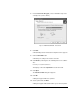
Profile Settings 27. Enter the Black values for this profile, or select one of the pre-
defined limits (Light, Medium, or Dark; the default is Light).
This allows you to adjust the Black Generation (BG) and Under
Color Replacement (UCR) curves and the grayscale smoothing
curve, and specify the starting point and maximum amount of Black
ink used for a given percentage of black called for in the image.
You can select a preset BG-UCR curve, enter numeric values, or
click the curve to change it.
These black values determine whether any black dots appear in
lighter shades, and the smoothness of transitions in dark shades.
28. Enter the Shadow Range and Black Point Shift, or accept the
default values.
• Increase the Shadow Range to smooth the transitions in dark
areas of the grayscale ramp, decrease to smooth the transi-
tions in the light areas of the ramp.
• The Black Point Shift adjusts the darkest shade (black point) in
the profile. It may be adjusted by ±25% (increase to lighten,
decrease to darken).
29. Enter a file Name for the profile.
For ease of use later, use a file name that includes the resolution,
number of passes, media, and the like. For example:
FB950_1x6_6x6_darkUCR_60shdw.icc
would indicate an FB950 printer, one set of six colors, 600x600 dpi,
“dark” UCR preset, and Shadow Range of 60.
30. Enter a Description for the profile.
This is the description that will appear in application programs
when you select the profile. The profile cannot be saved without a
description in this field.