
HP RIP Software - Release Notes


0706400 Revision F 2
Update Instructions
Note
For HP branding purposes, the URL for the RIP has changed to http://[hostname]/hp-ripsw,
where [hostname] is the name of your computer. The software updater will delete the kodiak
folder on your computer, and create a new one called hp-ripsw. Any bookmarks or shortcuts will
need to point to this new folder.
1. Exit any software programs that are running on the server workstation.
2. Disable anti-virus software as recommended by the manufacturer, and re-enable it after the RIP installation pro-
cess is complete.
Some anti-virus software may prevent the RIP from being properly installed.
You can update the RIP in either of two ways:
• Internet update with downloaded setup.exe file
• Local update from DVD-ROM
Note
After updating the software, delete all temporary Internet files from your Internet browser cache
and the Java control panel.
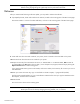
3. Click the link Check for updates in the RIP interface (on the computer that is actually running the RIP, not a remote
workstation connected over a network).
This causes the software to check for the latest version of the software stored on the HP web site, and compare it
to the version currently installed. If an update is available, the software will ask whether you want to perform the
update. Follow the instructions onscreen to complete the update.
4. Locate the setup.exe (installer) file you downloaded from the HP web site, or insert the DVD-ROM into the com-
puter’s disc drive and open the root folder of the drive.
The file name may include the version number of the software, for example: setup_1.4.999.exe.
5. Double-click the setup.exe file icon.
The installer displays two informational messages:
• The VideoNet protocol must be installed.
• The Microsoft Internet Information Services (IIS) must be installed and configured. For automatic configuration,
install IIS before running the RIP installer.
If you are updating the software, these components have already been installed. There is no need to install them
again.
6. Follow the prompts to complete the installation of the software.
7. Restart (reboot) the computer.
The installer places its system tray icon in the Windows Startup group. An “X” will appear over the icon until you
start the RIP. After the “X” over the icon disappears, it will take a few moments for the user interface to initialize
and fully reflect each of the components in the RIP. The initialization speed will depend on any other activity on
the computer or pending in the RIP.