
ColorSpan Legacy System Control - User Guide

External Disk Drives 2-29
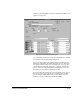
To Initialize an Existing
External Disk
Initializing a disk deletes all existing data on the disk, formats it
to work with the ColorSpan print server, and writes a ColorSpan
ID number so it will be recognized by any ColorSpan print
server.
To initialize a new SCSI disk, see page 2-30.
Caution
Initializing an existing disk (fixed or removable)
removes all data from the disk. Make sure you do not
have any important information stored on the disk
before you initialize it.
To initialize an existing external disk:
1. If you are initializing a removable disk, insert the disk into
the drive. Make sure the disk appears in System Control.
2. Click and hold either mouse button to display the disk icon
menu for the disk you wish to initialize.
3. Select Initialize.
A dialog box appears asking you to confirm that you want to
initialize the drive. Initializing the drive will delete all data
on the drive. You will not be able to recover (or “undelete”)
this data after the drive is initialized.
4. If you are sure that you want to initialize the drive, type
the drive name exactly as it appears in the dialog box.
5. Click OK.
System Control formats the disk and writes a special server
identifier on the disk. This enables the server to recognize
the disk if it is ever reconnected to the same (or a different)
server.
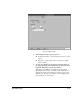
After initialization is complete, the Configure Rip Saver
Drive dialog appears.
6. Type in the name you want to assign to the disk.
7. Click OK.
8. Follow the instructions on the screen to restart the print
server using the System Menu.
After formatting is complete, the drive appears in the System
Control display as a new output queue.