
ColorSpan Legacy Printing Tools - User Guide for Microsoft Windows OS


Configuring the Image Utility 2-3
Configuring the
Image Utility
1. Run the Image Utility.
Double-click the file hpui.exe or the shortcut to it.
The Image Utility window appears.
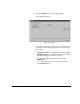
2. To set the preferences, select Preferences from the File
menu.
The Preferences dialog box appears. Click the tab corre-
sponding to the preferences you want to change. When you
change a setting, it is applied immediately.
3. Specify an output option.
• Directly to print server — The Image Utility sends print
files to the Windows default printer (Windows printing or
TCP/IP). To change the destination printer, change the
default printer in the Windows Printers Control Panel.
You can change the timeout value, which is the number
of minutes the Image Utility will attempt to send a print
job before it assumes that the print server is offline. If the
timeout is set too low, you may get an error message
while the file is still being sent. More time will be needed
to send larger files over slower networks. If the timeout is
set too high, it will take longer for you receive an error
message indicating an offline server. You can set the tim-
eout for between five and forty minutes; the default five
minutes.
Fig. 2-1. General options