
ColorMark Legacy Software Rip - Quick Start Guide


- 4 -
ColorMark Software RIP Quick Start Guide
Step 1. Install the Hardware
Caution The VideoNet card and your computer are susceptible to damage from electrostatic
discharge. Do not remove the card from its protective packaging until instructed to
do so in this procedure.
1. Start with the computer powered off and unplugged from the power outlet and all peripherals.
2. Install the VideoNet card into an available PCI expansion slot in the computer.
a. Place the computer on a sturdy table with ample clear space, preferably not on a carpeted floor.
b. Remove the cover from the computer case.
c. Touch the frame of the computer chassis to get rid of any static charge build-up from your body.
d. Select an available PCI expansion slot for the VideoNet card, and remove the slot cover if installed by removing the
screw.
e. Remove the VideoNet card from its protective packaging.
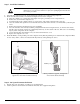
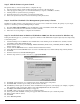
f. Press the VideoNet card carefully but firmly, straight down into the PCI expansion slot, as shown below. Ensure
that the card’s electrical contacts are seated firmly all the way to the bottom of the slot. Take care to avoid damag-
ing any other components in the computer.
g. Secure the VideoNet card with the screw you removed from the slot cover.
h. Replace the computer case cover.
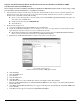
3. Install the RIP Key on the parallel port of the computer. Verify that the parallel port is enabled in the computer’s BIOS
.
Do not “daisy chain” (connect in serial) the RIP Key with any other parallel port device.
Step 2. Set Up and Connect the Printer
1. Unpack and set up the printer, according to its documentation.
2. Connect printer to the VideoNet card with the VideoNet cable supplied with printer.
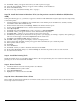
PCI slots (typical; number, exact location and
appearance varies with motherboard used)
RIP Key installation (typical; arrangement
varies with motherboard used)
PCI slots
Parallel port