
ColorMark Legacy Software Rip - Quick Start Guide


- 9 -
ColorMark Software RIP Quick Start Guide
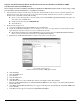
17 . Click Next. A dialog box appears that asks if you'd like to print a test page.
18 . Select No and click Next. A dialog box appears with a summary of the installation.
19 . Click on the Finish button.
20. Proceed to “Step 8. Install the Printing Tools” on page 9.
Step 7b. Install the Printer in Windows NT 4 (see the previous section for Windows XP/Windows
2000)
During the following process, you must be logged in to Windows with Administrator rights assigned (at least temporarily)
to install the printer.
1. Load the Printing Tools CD-ROM into the CD-ROM drive. If the Printing Tools CD-ROM is not available, load the
ColorMark Software RIP CD-ROM instead.
2. On the Windows Start menu, click Settings - Printers. The Printers window opens.
3. Double click the Add Printer icon to start the Windows Add Printer Wizard.
4. Select My Computer.
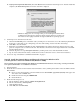
5. Click Next, then under Available Ports: scroll to and select \..\pipe\winlink0000.
6. Click Next. A dialog box appears that lists various manufacturers and printers.
7. Click Have Disk... A dialog box opens, asking for the location of the files.
8. Click Browse, and navigate to the folder that corresponds to your language (for example, “english”) and operating sys-
tem version. This displays a file named ntprint.inf in the file name field.
9. Click Open. The Install from disk dialog box reappears.
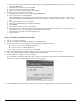
10. Click OK. A dialog box appears that displays a list of ColorSpan printers.
11 . Select a printer and click Next. A dialog box appears with a blank field for you to name the printer.
12 . Enter a printer name if desired.
13 . Click Next.
14 . Select Not Shared.
15 . Click Next. You may be asked to install the Windows NT CD-ROM.
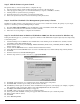
16 . In the printer Properties dialog box, click the Sharing tab and share the printer to the rest of the network.
17 . Close the Printers window.
Step 8. Install the Printing Tools
Install the Printing Tools on each client computer. Refer to the ColorSpan Printing Tools User Guide for instructions. The
printing tools are on the Software RIP CD-ROM.
Step 9. Print a Test File
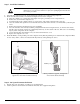
1. Load media and ink as described in the printer’s User Manual.
2. Select DiskDirect from System Control.
3. Select Internal Disk Drive.
4. Highlight one of the test files and click OK.
Step 10. Print a Document from a Client
Print a simple document from a Macintosh or Windows client to the server over the network. Refer to the Print Server &
Driver Setup Guide for instructions.