
HP XP24000/XP20000 Virtual LVI/LUN (VLL) and Volume Shredder User Guide (T5214-96094, November 2011)

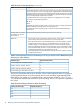
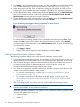
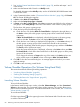

Figure 28 Message That Appears During Volume Formatting
If you click Close to close the message (Figure 28 (page 72)), the progress percentage will
not be shown, though the formatting will not be canceled. To re-display the progress
percentage, click Progress in the Customized Volume window.
To confirm whether the formatting operation has successfully finished after clicking Close,
check whether the Status column of the table in the Customized Volume window shows Normal.
If volumes appear in blue bold italics on the LDEV information table, do either of the following
to re-operate the volumes:
• Click Apply or Cancel.
• Right-click the volume displayed in blue bold italics and select Reset .
Formatting All Volumes in Disk Groups or Parity Groups
This section describes how to format all volumes in disk groups or parity groups. This procedure
formats all the volumes except for the following:
• Pool volumes
• Journal volumes
• Volumes whose access attribute are not Read/Write
• Volumes that are not blocked
• Quorum disks
To format all volumes in disk groups or parity groups:
1. Make sure that Remote Web Console is in Modify mode.
For detailed information about Modify mode, see the HP XP24000/XP20000 Remote Web
Console User Guide.
2. In the Customized Volume window (“Customized Volume Window” (page 24)), click Format
All. The Format All dialog box appears.
3. In Action, select Format.
4. In Parity Group Type, select Internal or External. Select Internal if you want to format volumes
in the XP24000/XP20000 disk array. Select External if you want to format volumes in external
storage systems.
5. In Target, select Box or Parity Group. Select Box if you want to format volumes in disk groups.
Select Parity Group if you want to format volumes in parity groups.
6. The list shows disk groups or parity groups.
7. Check the list by taking the following steps:
72 Performing Virtual LVI/LUN and Volume Shredder Operations