
HP XP24000/XP20000 Virtual LVI/LUN (VLL) and Volume Shredder User Guide (T5214-96094, November 2011)
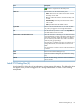

DescriptionItem
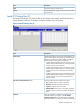
Opens the Install CV dialog box (2).Next
Cancels the selected settings and returns to the Customized
Volume window.
Cancel
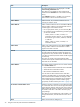
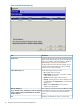
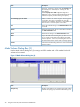
Install CV Dialog Box (2)
The Install CV dialog box (2) shows a table of VLL volumes to be created. Use this dialog box to
specify the LDKC numbers, CU numbers, and LDEV numbers of the VLL volumes.
Figure 8 Install CV Dialog Box (2)
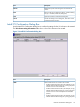
DescriptionItem
Number of the VDEV to which the VLL volume belongs. The
VDEV number indicates the parity group where the VDEV
Parity Group
belongs. For example, if the VDEV number is 1-1-(1), the
VDEV belongs to a parity group numbered 1-1.
• A VDEV number that starts with E (for example, E1-1-(1))
indicates that the VDEV belongs to a parity group that
consists of one or more external LUs.
• A VDEV number that starts with V (for example, V1-1-(1))
indicates that the VDEV belongs to a parity group that
consists of one or more XP Snapshot virtual volumes
(V-VOLs).
• A VDEV number that starts with X (for example, X1-1-(1))
indicates that the VDEV belongs to a parity group that
consists of one or more XP Thin Provisioning virtual
volumes (V-VOLs).
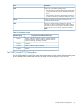
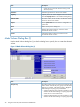
Information about the VLL volumes to be created.VLL volume setting-information table
• No.: Number of the VLL volume in the table.
• Emulation: Emulation type of the VLL volume.
• Capacity: Capacity of the VLL volume.
• LDKC:CU:LDEV: LDKC number, CU number, and LDEV
number for the VLL volume to be created. The default is
blank.
When this check box is selected, VLL volumes of the
3390-3R emulation type appear in the VLL volume
3390-3R
setting-information table on the left side of this dialog box.
When this check box is cleared, VLL volumes of other than
Install CV Dialog Box (2) 31