
HP StorageWorks XP24000 Continuous Access Journal Software User and Reference Guide, v01 (T5278-96001, June 2007)

Note
: To g et the serial number for the remote storage system, ask the adm inistrator of the remote
storage system. The serial number will be displayed in the Remote Web Console main window
when the Remote Web Console user logs into the storage system.
2. Ensure that the Remote Web Console m ain window is in Modify m ode.
For detailed information about how to do this, see HP StorageWorks XP24000 Remote Web
Console User’s Guide.
3.
Ensure that the DKC Operation window is displayed (see “DKC Operation Window” on page 85).
4. In Display,select DKC.
5. Select LDKC from the tree.
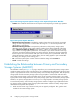
6. Right-click the upper-right list, and then select DKC Operation and Add DKC.
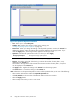
The Add D KC window appears (see Figure 50 on page 100).
7. In the Add DKC window, enter the following:
• the serial number of the remote storage system
• the LD KC numb er of the remote storage system
00 is
displayed when the remote storage system is an HP XP12000 Disk Array.
• the controller ID of the remote storage system (model name that indicates the model)
Note
: The controller ID for a storage system is 5(XP24).
• the path group ID
The path group ID is within the range of 1-FF (hexadecimal). Up to 64 path group IDs can
be
registered per storage system.
Note
: In the current version, the path group IDs always take the default values and cannot be
changed.
8. In the Add DKC window, select a primary storage system port and a remote storage system por t
to
configure a logical path.
9. Select Option.
10. In the DKC Option window, configure logical path options and storage system options.
For detailed information about the options, see
“Changing Options for Logical Paths and Storage Systems” on page 101 and read the
explanations below Figure 51 on page 101.
11. Select Set to close the DKC Option window.
12. See the Preview list to check the settings that you have m ade.
• To mo d ify a setting, select and right-click the setting from the Preview list and then select
Modify. A window appears and allows you to modify the setting.
• To cancel a setting, select and right-click the setting in the Preview list and then select Cancel.
13. Select Apply to apply the settings that you have made.
Note
: If an error occurs, the right-most column of the Preview list displays the error code. To
view detailed information about the error, right-click the error code and then select Error Detail.
An error message appears and gives you detailed information about the error.
XP24000 Continuous Access Journal Software User a nd Reference Guide
99