
HP StorageWorks XP Snapshot Software user guide: HP XP12000, HP XP10000, HP 200 Storage Virtualization System (T1713-96026, March 2009)
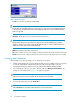

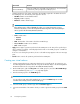

16. Select the area in the Select LDEV No. area. The color of the selected area changes to blue. CU
and LDEV numbers are added to the V-VOL information setting list, and blue italics changes to
black normal.
To set multiple V-VOLs, repeat step 13 through step 16.
17. Click Next. The Create V-VOL wizard pane (3) (Figure 16 on page 63) appears.
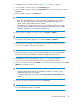
18. Check the settings. If there is no problem, click OK. The Create V-VOL wizard pane (3) closes,
and the V-VOL pane appears. In the V-VOL pane, settings appear in blue italics.
19. Click Apply. A confirmation message appears.
20. Click OK. The confirmation message closes, and the new V-VOL information is applied to the
array.
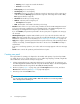
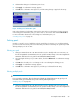
Figure 13 New V-VOL Group pane
• V-VOL Group: V-VOL group ID. Select or enter a whole number from 1 to 8192.
NOTE:
Do not enter a V-VOL group ID that another V-VOL group is already using. If you enter a V-VOL
group ID that another V-VOL group is already using and click Next, an error message appears.
In that case, select or enter a different number for the new V-VOL group ID.
• Emulation Type: V-VOL group's emulation type.
• CLPR: V-VOL group's CLPR.
• Next button: Fixes settings in the New V-VOL Group pane, and displays the Create V-VOL wizard
pane (1).
• Cancel button: Cancels settings in the New V-VOL Group pane, and closes the pane.
XP Snapshot operations60