
HP StorageWorks XP Remote Web Console User Guide: HP XP12000 Disk Array, HP XP10000 Disk Array, HP 200 Storage Virtualization System (T1714-96031, June 2010)
For JRE 5.0 and JRE 6.0
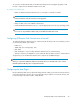
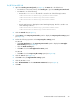
1. Open the Java Plug-in Control panel (see Figure 3). The Basic tab is the default view.
• For Windows: In the Control Panel, click Java Plug-in to open the Java Plug-in Control Panel.
• For UNIX: Do one of the following:
• Execute the ControlPanel file. The file is stored in one of the following locations:
<SDK installation directory>/jre/bin/ControlPanel
<SDK installation directory>/bin/ControlPanel
<JDE installation directory>/bin/ControlPanel
or
• Use the web browser to display the Control Panel applet page. The file is stored in one
of the following locations:
<SDK installation directory>/jre/ControlPanel.html
<JRE installation directory>/ControlPanel.html
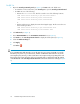
2. Click the General tab (see Figure 7).
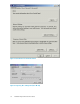
3. Click Settings in the Temporary Internet Files panel to display the Temporary Files Settings panel
(see Figure 11).
4. Perform the following operations in the Temporary Files Settings panel:
For JRE 5.0:
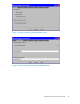
• Click View Applications on the Temporary Internet Files panel to display the Java Applet
Cache Viewer panel (see Figure 9).
• Clear the Enable Caching box.
• Click OK to close the Java Applet Cache Viewer panel.
For JRE 6.0:
• Click OK to close the Temporary File Settings panel (see Figure 10).
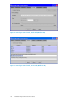
5. Click the Java tab (see Figure 12).
6. Click View in the Java Applet Runtime Settings panel.
7. Click the JRE that is in use.
8. Enter -Xmx268435456 into the Java Runtime Parameters box (see Figure 4).
9. Click OK.
XP Remote Web Console User Guide 29