
HP StorageWorks XP Remote Web Console user guide for the XP12000/XP10000 (December 2005)


Setting SNMP Agent Properties 102
4-3-4 Deleting a Community Name
To delete a community name:
1. Change to Modify mode.
2. Click Install (
).
3. Click the SNMP IP Security tab.
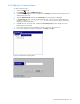
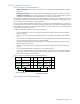
4. In the Community & Trap box, select and then right-click the unwanted community. The Delete Community
popup menu is displayed (see Figure 4-7).
5. Select the Delete Community command. A confirmation message is displayed.
6. Click OK to delete, or click Cancel to cancel the operation. The selected community is deleted from
Community & Trap, but the setting is not yet implemented in the subsystem.
7. If you want to apply the changes to the subsystem, click Apply. Click OK.
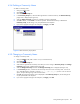
Figure 4-7 Delete Community Pop-Up Menu
4-3-5 Changing a Community Name
To change a community name:
1. Change to Modify mode (refer to section 2-5 if you need instructions).
2. Click Install (
).
3. Click the SNMP IP Security tab.
4. Select and then right-click the community name that you want to change in Community & Trap. The Change
Community popup menu is displayed (see Figure 4-8).
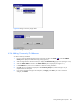
5. Select the Change Community command. The Change Community pane is displayed (see Figure 4-9).
6. In the Community text box, overwrite the old community name with a new community name. You can use
up to 180 alphanumeric characters, except for ", \, ;, :, ,, *, ?, <, >, |, /, ^, &, and %. You can also use
spaces, except at the beginning or the end of the name.
7. Click OK. The changed community name is displayed in the Community & Trap box, but the changes are
not yet implemented in the subsystem.
8. If you want to apply the changes to the subsystem, click Apply. Click OK.