
HP StorageWorks Continuous Access XP user guide for the XP10000/XP12000 (December 2005)


74 Continuous Access XP for the XP10000/XP12000
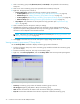
3. To add SSIDs:
a. Right-click, and click Edit SSID(s)&Path(s).
b. Right-click, and click Add SSID. The Add SSID pane appears.
c. Enter new SSIDs in the SSID fields. You can add up to four SSIDs to the RCU.
d. Click Set to add the SSIDs. The list changes to the SSID Settings Parameter list. The added SSIDs are
listed.
NOTE: After being set, options can be modified and canceled (see ”Modifying parameters and
deleting settings” on page 75).
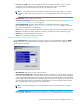
4. To delete SSIDs:
a. Right-click, and click Edit SSID(s)&Path(s).
b. Right-click, and click Delete SSID. The list changes to the SSID Settings Parameter list. Only RCUs to
be deleted are listed.
NOTE: After being set, options can be modified and canceled (see ”Modifying parameters and
deleting settings” on page 75).
5. Click Apply on the Continuous Access XP main pane to apply settings to the disk array.
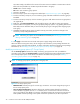
Port change operation
Use the RCU Operation tab to change the port mode. Clicking Port in the Switch Display box changes the
tree to the Port tree and changes the list to the Port list. Use the Port tree and Port list to change the port
type.
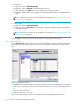
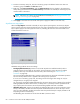
Figure 42 Changing port types
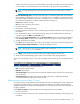
1. Click Port in the Switch Display box to change the tree to the Port tree and change the list to the Port list.
2. Click a port or a port type from the Port tree. Only the selected port or port type is displayed in the Port
list.
3. Click the ports in the Port list.
4. Right-click, and select a port type.
For the port change operation, there is no separate pane. The list keeps displaying the Port list.