
HP StorageWorks Auto LUN XP user guide for the XP128/XP1024 (December 2005)
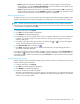
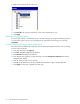
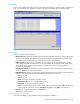
Table Of Contents
- Contents
- Auto LUN XP for the XP128/XP1024
- Auto LUN XP features
- Auto LUN XP tasks
- Reserve volumes
- Volume migration
- Estimating usage rates
- Automatic migration
- Manual migration
- Requirements and restrictions
- Starting Auto LUN XP
- Creating and executing migration plans
- Troubleshooting Auto LUN XP
- Auto LUN/Performance Control Base Monitor for the XP128/XP1024
- Auto LUN statistics
- Usage statistics
- Collecting usage statistics about disk array resources
- Viewing parity group usage statistics
- Viewing logical volume usage statistics
- Viewing channel adapter (CHA) usage statistics
- Viewing channel processor (CHP) usage statistics
- Viewing disk adapter (DKA) usage statistics
- Viewing disk processor (DKP) usage statistics
- Viewing data recovery and reconstruction processor (DRR) usage statistics
- Viewing write pending rates
- Viewing access path usage statistics
- Workload and traffic statistics
- Index
32 Auto LUN XP for the XP128/XP1024
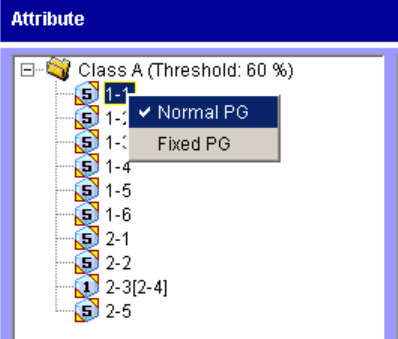
5. Right-click the parity group you want to fix.
Figure 11 Attribute tab tree
6. Click Fixed PG. The parity group becomes “fixed” and is marked with an icon.
7. Click Apply.
Releasing (unfixing) parity groups
To move logical volumes in a fixed parity group to another parity group, change the fixed parity group to
a normal parity group. To do this, go to the Attribute tab, right-click the fixed parity group, and click
Normal PG.
Changing maximum disk usage rates for HDD classes
Each HDD class has a default disk usage rate. This limit affects auto migration behavior. You can change
the limit on disk usage rate.
1. In the Auto LUN pane, click Physical.
2. Click Plan. The Manual Migration tab appears.
3. Click Attribute. The Attribute tab appears.
4. In the Attribute tree, right-click an HDD class folder, and click Change Class Threshold. The Change
Threshold pane appears.
5. Click the value you want to use as the limit.
6. Click OK. In the Attribute tree, the selected value is displayed to the right of the specified class.
7. Click Apply. The new limit is applied to the disk array.