
HP StorageWorks Auto LUN XP user guide for the XP128/XP1024 (December 2005)
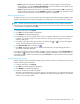
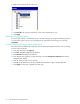
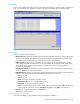
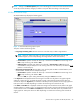
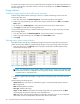
Table Of Contents
- Contents
- Auto LUN XP for the XP128/XP1024
- Auto LUN XP features
- Auto LUN XP tasks
- Reserve volumes
- Volume migration
- Estimating usage rates
- Automatic migration
- Manual migration
- Requirements and restrictions
- Starting Auto LUN XP
- Creating and executing migration plans
- Troubleshooting Auto LUN XP
- Auto LUN/Performance Control Base Monitor for the XP128/XP1024
- Auto LUN statistics
- Usage statistics
- Collecting usage statistics about disk array resources
- Viewing parity group usage statistics
- Viewing logical volume usage statistics
- Viewing channel adapter (CHA) usage statistics
- Viewing channel processor (CHP) usage statistics
- Viewing disk adapter (DKA) usage statistics
- Viewing disk processor (DKP) usage statistics
- Viewing data recovery and reconstruction processor (DRR) usage statistics
- Viewing write pending rates
- Viewing access path usage statistics
- Workload and traffic statistics
- Index

Auto LUN XP user guide for the XP128/XP1024 31
• CLPR: Number and name of the CLPR that corresponds to the parity group to which the logical
volume belongs, in the format CLPR number:CLPRname. For more information about CLPRs, see the
HP StorageWorks XP Disk/Cache Partition User Guide.
• Owner: Program that reserved the volume. If Auto LUN XP reserved this volume, USP is displayed. If
another program reserved this volume, Other[XX] is displayed, where [XX] is the program ID. If this
volume is not reserved and is a normal volume, a hyphen (-) is displayed.
Reserving target volumes
To migrate volumes, you must reserve logical volumes as migration destinations (targets) regardless of the
migration method (manual or automatic). Migration will not take place if no logical volume is reserved.
NOTE: The term reserved volume refers to a volume that is reserved for use as a migration destination.
Reserved volumes are denoted by blue icons. The term normal volume sometime refers to a volume that
is not reserved as a migration destination.
1. In the Auto LUN pane, click Physical.
2. Click Plan. The Manual Migration tab appears.
3. Click Attribute. The Attribute tab appears.
4. In the Attribute tree, locate a logical volume to use as a migration destination. First click an HDD class
to display a list of parity groups in that class. Next, click a parity group to display a list of logical
volumes in that group.
5. In the table on the right, locate logical volumes preceded by the or icons. From those logical
volumes, choose the logical volume, and right-click.
6. Click Reserved LDEV. The icon changes to .
7. Click Apply. The settings in the pane are applied to the disk array. The specified logical volume is
reserved as a migration destination.
If you right-click a logical volume preceded by the icon (reserved volume) and click Normal LDEV, the
icon changes to , and you cannot use the volume as a migration destination. This procedure does not
work when the logical volume is preceded by the green Reserved icon, which indicates another program
reserved the volume.
Setting (fixing) parity groups
The auto migration function excludes fixed parity groups. However, volumes in a fixed parity group can be
used for manual migration operations.
1. In the Auto LUN pane, click Physical.
2. Click Plan. The Manual Migration tab appears.
3. Click Attribute. The Attribute tab appears.
4. In the tree, double-click an HDD class folder.
The table on the right displays a list of parity groups in the HDD class. An icon indicates parity groups
that can include source or target volumes. A different icon indicates fixed parity groups, which cannot
include source nor target volumes.