
HP Hitachi ShadowImage for Mainframe User Guide (T5213-96032, November 2011)
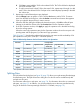
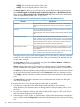
Table Of Contents
- Hitachi ShadowImage™ for Mainframe User's Guide
- Contents
- 1 Overview of Hitachi ShadowImage™ for Mainframe
- 2 About ShadowImage for Mainframe Operations
- 3 Interoperability with other Products and Functions
- Virtual LVI
- Cache Residency Manager
- Volume Security
- Volume Retention Manager
- XP Auto LUN
- HP XP External Storage Software
- Hitachi TrueCopy™ for Mainframe
- XP Continuous Access Journal Software™ for Mainframe
- TrueCopy for Mainframe and Universal Replicator for Mainframe
- HP XP for Compatible Extended Remote Copy (XRC) Software
- Concurrent Copy
- 4 Preparing for ShadowImage for Mainframe Operations
- 5 Using the ShadowImage for Mainframe GUI
- 6 Performing ShadowImage for Mainframe Operations Using Remote Web Console
- Configuring the Volume List
- Changing or Deleting the Settings in Preview List
- Setting or Resetting the Reserve Attribute
- Setting Options
- Configuring CTGs
- Adding Pairs
- Splitting Pairs
- Using PPRC Commands to Split, Resynchronize, and Delete Pairs in a CTG
- Suspending Pairs
- Resynchronizing Pairs
- Deleting Pairs
- Viewing Detailed Volume and Pair Information
- Viewing the Number of Pairs and License Information
- Viewing Pair Operations History
- 7 Performing ShadowImage for Mainframe Pair Operations Using XP for Business Continuity Manager Software
- 8 Performing ShadowImage for Mainframe Pair Operations Using PPRC
- 9 Troubleshooting
- 10 Support and Other Resources
- Glossary
- Index

d. Click Set to create (add) the T-VOL to the selected S-VOL. The T-VOL will then be displayed
next to the selected S-VOL.
e. To add a second and/or third T-VOL to the same S-VOL, repeat steps b through d to add
each T-VOL to the selected S-VOL. Each pair to be created displays separately in the Add
Pair Volume List.
7. Repeat step 6 until all desired pairs are displayed.
Use the Change button to replace a T-VOL. Use the Set button to add a T-VOL. To remove
pairs from the Add Pair dialog box, select the Delete command from the menu that appears
when you right-click the pair that you want to remove.
8. When the Add Pair dialog box displays the desired new pairs, click OK to reflect all pairs
(settings) in the Add Pair Volume List to the Preview List in the Pair Operation window.
9. In the Pair Operation window, click Apply to apply the operations set in the Add Pair dialog
box to the storage system.
When the initial copy operations start, the Pair Operation window shows the new pairs with
pending status and the progress (%) of the initial copy operations.
Table 29 (page 71) describes the relationship between the pair status and the availability of SIz
pair operations on the pairs. (CMD RJT = command rejected.)
Table 29 Relationship between the Pair Status and the Pair Operations
Pair OperationsPair Status
Delete PairSuspend Volume
Pair
Resynchronize
Volume Pair
Split Volume PairAdd Pair
YESYESNO (CMD RJT)YESNO (CMD RJT)
1
Pending
YESYESNO (CMD RJT)YESNO (CMD RJT)
1
Duplex
YESYESNO (CMD RJT)NO (CMD RJT)
1
NO (CMD RJT)
1
SP-Pend
NO (CMD RJT)YESYESNO (CMD RJT)
1
NO (CMD RJT)
1
V-Split
YESYESYESNO (CMD RJT)
1
NO (CMD RJT)
1
Split
YESYESNO (CMD RJT)NO (CMD RJT)
1
NO (CMD RJT)
1
Resync
YESYESNO (CMD RJT)NO (CMD RJT)
1
NO (CMD RJT)
1
Resync-R
YESNO (CMD RJT)YESNO (CMD RJT)
1
NO (CMD RJT)
1
Suspend
1
The operation to the S-VOL is available.
Splitting Pairs
The Split Volume Pair dialog box (see Figure 33 (page 72)) allows you to split existing ShadowImage
for Mainframe pairs. The Split Volume Pair dialog box can also be used to simultaneously add
and split new SIz pairs.
For information about how to split pairs, see (page 74). For information about how to create and
split pairs, see (page 75). In addition, you can split multiple pairs at the same specified time by
using XP for Business Continuity Manager Software™. For details, see (page 76).
Splitting Pairs 71