
Hitachi TrueCopy for IBM z/OS User and Reference Guide (T5211-96001, June 2007)


5-10 Performing TrueCopy for z/OS Configuration Operations
Hitachi Universal Storage Platform V TrueCopy for IBM z/OS User’s Guide
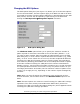
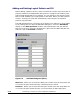
3. Right-click the list (an RCU does not have to be selected), click RCU
Operation, and click Add RCU to open the Add RCU dialog box (refer to
Figure 5-1).
4. On the Add RCU dialog box, enter the S/N, LDKC number, controller ID (5 for
USP V, 4 for TagmaStore USP/NSC, 3 for 9900V), CU number, and SSID(s)
for the desired RCU CU. The MCU verifies the S/N when the paths are
established, and verifies the SSIDs when the pairs are created. If desired,
you can add and delete SSIDs later using the Add SSID dialog box.
5. Select the MCU port and RCU port (for fibre). The MCU will not allow you to
establish less than the minimum number of paths as specified on the RCU
Option dialog box. If desired, you can add and delete paths later using the
Add Path dialog box.
6. Click the Option button to open the RCU Option dialog box, and enter the
desired settings for the TrueCopy for z/OS RCU options.
Note: When you have TrueCopy for z/OS Async pairs configured on fibre-
channel interface, set the same value for the Minimum Paths option for
all RCUs.
7. Click Set to close the RCU Option dialog box, even if you made no changes.
(Click Cancel to cancel the add RCU operations.) The preview list now
displays the requested add RCU operation(s).
8. Verify the requested operation(s) displayed in the preview list.
To change one or more operations, select the operation(s), right-click the
preview list, and click Modify. To remove one or more operations, select
the operation(s), right-click the preview list, and click Delete. To cancel all
operations, select all the operations in the preview list, right-click, and click
the Delete command, or click the Cancel button.
9. To start the operation(s), click Apply. The changes that you set are reflected
in the upper list on the window. The preview list is cleared. If one or more
operation(s) did not start normally, the preview list displays only the
operation(s) that did not start normally. An error code is displayed on the
Error Code column in the preview list. To display the error message, right-
click the preview list and click Error Detail command. If some errors occur
simultaneously, the error messages are displayed at the same time. Click the
Apply button again.