
Hitachi ShadowImage for IBM z/OS User"s Guide (T5213-96002, June 2007)

5-22 Performing ShadowImage for z/OS
Operations Using Storage Navigator
Hitachi ShadowImage™ for IBM
®
z/OS
®
User’s Guide
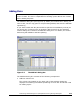
When the Split Volume Pair operation(s) start, the Pair Operation window
shows the new pairs with SP-Pend or V-Split status and the progress (%)
of the update copy operation(s). The Split status is displayed right away if
there were no pending update copy operations.
Performing Pair Addition and Pair Splitting
The Split Volume Pair dialog box can also be used to simultaneously add and
split new SIz pairs.
Caution: If you want the T-VOLs you are intending to split to be identical to
the S-VOLs, stop all write operations to the S-VOLs before splitting the pairs.
This ensures that there are no updates to the S-VOLs while the split operations
are synchronizing the T-VOLs to the S-VOLs.
The S-VOL and T-VOL are synchronized only when the pair status changes
from SP-Pend or V-Split to Split. Due to the SIz asynchronous update copy
operations, this status transition can take several minutes.
To simultaneously add and split one or more new SIz pairs:
1. Go to the Pair Operation window, and select the desired CU image or S-
VOL in the Tree to filter the pairs displayed in the Volume List.
2. Select the Simplex volume(s) that will be the S-VOL(s) of the new pairs to
be added and split, right-click the selected S-VOL(s) to display the pop-up
menu, and then select the Split Pair command to open the Split Volume
Pair dialog box.
3. On the Split Volume Pair dialog box, select the copy pace from the Copy
Pace drop-down list.
4. Select the split type for all pairs being added and split from the Select
Split Type drop-down list.
5. Specify the T-VOL(s) you want to pair up with each S-VOL by following the
steps below:
a. From the Split Volume Pair Volume List, select the desired S-VOL.
b. From the LDKC drop-down list, select the desired LDKC, and from the
CU drop-down list, select the desired CU image.
c. Select the Reserved checkbox to make the reserved volumes appear
on the T-VOL List.
Reserved volumes are displayed on the T-VOL List.
d. From the T-VOL List, select the desired T-VOL.
Note: You can also select the T-VOL from un-reserved volumes,
because once you select an un-reserved volume, the storage system
will automatically set its reserve attribute and make it a reserved
volume.
e. Click Set.