
Hitachi HPAV for z/OS for the XP128/XP1024/XP12000/XP10000 (HITA737-96003, March 2007)

HPAV for z/OS user guide for the XP128/XP1024/XP12000/XP10000 19
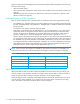
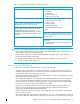
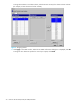
The Free Volume List box displays the LDEV IDs of the unused volumes in the selected CU. Each of these
free volumes can be used as an HPAV alias device. When assigning aliases to base volumes, select the
alias devices from this list.
• The Selected box displays the number of selected free devices and the total number of free devices in
the selected CU image. For example, 8/47 indicates that eight free devices are selected out of a total
of 47 free devices in the selected CU image.
• Click Select All to select all volumes in the Free Volume List box.
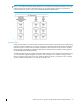
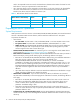
Clicking the Æ button cancels aliases for base devices (see ”Canceling Aliases” on page 21). After
clicking the Æ button, the Free Volume List box then displays their LDEV IDs. To complete your request to
cancel the aliases as specified, click Apply.
Clicking the Å button assigns aliases to base devices (see ”Assigning Aliases” on page 19). After clicking
the Å button, the Alias Volume List box displays the new alias devices. To complete your request to assign
the new aliases as specified, click Apply.
The Apply button applies the settings made on this window to the XP1024/XP128/XP12000/XP10000.
Clicking this button displays a message confirming that you want to apply your request to the disk array.
NOTE: When switching CU groups to set multiple CU groups, select Apply for each CU group to reflect
the operation for CU group setting to the subsystem.The setting will be invalid if the CU group is switched
to another CU group before selecting Apply.
The Cancel button discards changes in this window to restore the initial settings.
Performing HPAV Operations
After you have prepared for HPAV operations as described in ”Preparing for HPAV Operations” on
page 16, you are ready to start performing HPAV operations on the XP1024/XP128/XP12000/XP10000.
HPAV operations include:
• Assigning and canceling aliases (see page 19)
• Defining the XP1024/XP128/XP12000/XP10000 devices to the host system (see page 22)
Assigning and Canceling Aliases
Assigning Aliases
Before you assign HPAV aliases, you should have determined the required number of aliases for each base
device to meet your operational requirements (see ”Maximizing Your HPAV Results” on page 15). If you
assign additional aliases after starting I/O operations to the XP1024/XP128/XP12000/XP10000 HPAV
devices, you will need to redefine the XP1024/XP128/XP12000/XP10000 HPAV devices to the host
operating system.
You can assign up to 15 aliases to one base device. The HPAV assign alias function pairs each selected
base volume with one or more of the selected free volumes. If the number of selected free volumes is larger
than the number of selected base volumes, this function attempts to allocate the free volumes equally to the
base volumes. For example, if six free volumes and two base volumes are selected, three free volumes
(aliases) are allocated to each base volume.
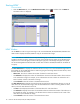
To assign aliases to volumes in the connected XP1024/XP128/XP12000/XP10000:
1. From the HPAV window, select the CU group which includes the CU number to be set, in the drop-down
list to select CU groups located in the upper right part of the HP XP Remote Web Console main panel.
See the HP StorageWorks XP Remote Web Console User Guide for XP12000/XP10000 for the details.
2. Click the CU image that contains the base volumes. The Free Volume List box displays the total number
of available free volumes.
3. To add the new aliases to the Alias Volume List box, click the base volumes in the Base Volume List box,
click the free volumes in the Free Volume List box, and then click the Å button.
To assign one alias to each base volume, select the same number of free volumes as base volumes.