
HP Remote Graphics Software Licensing Guide


5 HP RGS floating license products
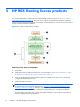
The recommended steps to install and license RGS floating products are shown in Figure 5-1 Steps to
install and license RGS on page 18. The steps shown in green are described in this guide. Note that
variations to this sequence are possible—for example, as indicated below, you can reverse the order of
license installation and RGS installation.
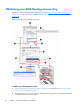
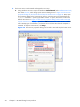
Figure 5-1 Steps to install and license RGS
Summary of the steps to install RGS:
1. Order RGS.
2. Obtain RGS and your RGS License Key For more information, see
HP RGS Trial Edition on page 7
or
Obtaining your RGS product and its License Key on page 10.
3. If you are using floating licenses and don’t yet have a FLEXnet license server set up, install and
configure the FLEXnet license server.
4. Install your RGS License Key.
5.
NOTE: These two sets of steps can be reversed in order. You could first install RGS and validate
its operation (but with the popup dialog shown in
Figure 1-2 Dialog generated when the RGS
Sender is unlicensed on page 2), and then install the FLEXnet license server (if needed) and the
License Key. Once the License Key is installed, the popup dialog will no longer be displayed.
The advantage of the order shown is that, during RGS installation, you will know and be able to
enter the requested licensing information.
18 Chapter 5 HP RGS floating license products