
HP Remote Graphics Software 5.4.8 User Guide
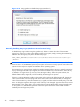
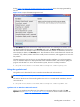

dialog Figure 3-20 Output of the RGS Diagnostics Tool on page 81 shows the output generated by
the tool.
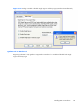
Figure 3-20 Output of the RGS Diagnostics Tool
The Test Name left panel shows the list of tests that have been run. Selecting a test with the mouse
will display additional information in the Results right panel. The Rerun Tests button on the bottom
left reruns all tests. The example window shows that all tests have passed. If a test failed, click the test
title to display its details in the Results panel. This information can be used to determine what this test
looked for, why it failed, whether this failure would prevent connections, and suggestions on how to fix
the problem.
The RGS Diagnostics Tool can be run any time after RGS Sender installation. To run the Diagnostics
Tool, use Windows Explorer to display the RGS Sender installation folder, and locate the rgdiag.exe
program with the RGS icon. On a 32-bit Windows system, this tool is normally located at:
C:\Program Files\Hewlett-Packard\Remote Graphics Sender\rgdiag.exe
Using the rgadmin tool
The rgadmin tool is described for use on Windows XP Professional and Windows 7.
NOTE: The rgadmin tool is only installed and supported on Windows XP and Windows 7.
This section describes use of the Sender rgadmin.exe tool. For a normal Sender installation, this tool
can be found at:
C:\Program Files\Hewlett-Packard\Remote Graphics Sender\rgadmin.exe
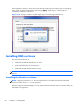
rgadmin tool on Windows XP Professional
When run on Windows XP Professional, the rgadmin.exe program displays two tabs. The 3D
Updates tab (see
Figure 3-21 3D Updates tab on page 82) can be used to enable automatic 3D
Installing RGS on Windows
81