
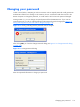
HP Remote Graphics Software 5.4.8 User Guide

Setup Mode can be activated in two ways:
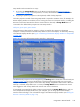
1. By clicking the Setup Mode button on the Receiver Control Panel (see
Figure 5-2 Receiver
Control Panel on page 102). This presumes, of course, that the Receiver Control Panel is visible.
2. By typing a special key sequence on the keyboard, called a hotkey sequence.
The hotkey sequence method of activating Setup Mode is required in situations where, for example, the
Remote Display Window is borderless, and is covering the entire Local Computer monitor, including the
Receiver Control Panel. Because the Receiver Control Panel is obscured, its Setup Mode button is
inaccessible. The default hotkey sequence to enter Setup Mode is:
Shift press, space press, space release
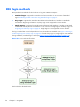
When the Receiver detects this key sequence, it does not send the key sequence to the Remote
Computer—instead, the Receiver activates Setup Mode on the Local Computer, as denoted by dimming
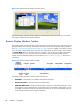
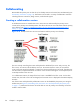
of the Remote Display Window (see
Figure 5-4 Dimming of the Remote Display Window in Setup Mode
on page 105).
Figure 5-4 Dimming of the Remote Display Window in Setup Mode
The default hotkey sequence can be changed using the Hotkeys tab in the Receiver Control Panel (see
Hotkeys on page 156). As long as the Shift key is held down (following the Shift press, space press,
and space release hotkey sequence used to enter Setup Mode), Setup Mode remains active. When the
Shift key is released, Setup Mode exits. In contrast, the Setup Mode button on the Receiver Control
Panel toggles the state of Setup Mode each time the user clicks on the button.
If Setup Mode is activated by the hotkey sequence (as opposed to the Setup Mode button), and you
have multiple Remote Display Windows on your computer, you can bring up the Remote Display
Window selection dialog to view a thumbnail image of each Remote Display Window (see
Starting the
Receiver in Directory Mode on page 172)
Using RGS in Normal Mode
105