HP Remote Device Access iCAS User Guide Software Version: 8.
Legal Notices Warranty The only warranties for HP products and services are set forth in the express warranty statements accompanying such products and services. Nothing herein should be construed as constituting an additional warranty. HP shall not be liable for technical or editorial errors or omissions contained herein. The information contained herein is subject to change without notice. Restricted Rights Legend Confidential computer software.
Contents Contents 3 About This Document 4 Intended Audience 4 Document Revision History 4 Chapter 1: About iCAS 5 Understand the Meet at the Middle Model 5 iCAS Overview 5 Chapter 2: Installing the iCAS Proxy Connection 9 9 Updating the iCAS 10 Removing the iCAS 10 Chapter 3: Using the iCAS 11 Give Access 11 Terminate a Pipe 11 Terminate a Connection 11 Chapter 4: iCAS Configuration 13 Configure Proxy Servers 13 Access Logs 13 View Active Pipes 14 Glossary HP Remote Devi
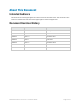
About This Document Intended Audience This document is for HP support agents who assist customers with iCAS issues. This document is also useful for customers who work with an HP support agent to resolve a support issue. Document Revision History Edition Software Version Publication Date Edition 1 RDA 6.0 January 2011 Edition 2 RDA 6.1 June 2011 Edition 3 RDA 7.0 December 2011 Edition 4 RDA 7.1 June 2012 Edition 5 RDA 7.2 December 2012 Edition 6 RDA 7.3 June 2013 Edition 7 RDA 8.
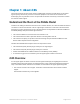
Chapter 1: About iCAS The Instant Customer Access Server (iCAS) is a lightweight connection tool that allows an HP support agent to quickly and securely connect to customers' equipment. The customer runs the iCAS as a browser plug-in on any Windows or Linux computer that has network connectivity to the device for which the customer needs support.
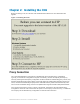
Chapter 1: About iCAS 2. The HP support agent generates a session key through the iRAP tool by clicking Generate Key. Then the HP support agent communicates this key with the URL for the iCAS to the customer over the phone, in a chat, or via e-mail. 3. The customer navigates to the URL, downloads and installs the iCAS plug-in onto the desktop (if this is the first time they have used the tool). 4. Before the customer can enter the connection key, he/she must accept the HP License Agreement. 5.
Chapter 1: About iCAS 6. In the Connection Key field, the customer types the session key if necessary. The system includes the initial key in the generated URL. 7. To start the iCAS connection, the customer clicks Connect to HP. The iCAS plug-in displays the connection progress.The iCAS establishes an SSH tunnel to HP. 8. The HP support agent looks for the tunnel to arrive at HP (using a small monitor in the RAP). 9. Once the connection arrives, the HP agent clicks Connect.
Chapter 1: About iCAS 10. The HP support agent launches diagnostic tools to deliver service. Diagnostic tools connect via TCP or UDP to specified customer devices. 11. The iCAS indicates which targets, ports, and protocols are in use. The customer can allow or disallow the HP support agent's connections to individual devices and ports. 12. When the HP support agent resolves the issue, either the HP support agent or the customer clicks Terminate Connection. The support call ends. HP Remote Device Access 8.
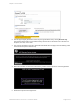
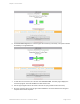
Chapter 2: Installing the iCAS Before connecting to HP, the customer must download and install the iCAS. The download screen appears. Figure 2.1 Installing the iCAS Proxy Connection The current default behavior of the iCAS is to automatically use the systems proxy configuration. Typically, no manual user configuration is required. If necessary, the user can explicitly set the proxy server by selecting the manual proxy configuration.
Chapter 2: Installing the iCAS Figure 2.2 Advanced Configuration Tab The Auto-Detect Proxy option will automatically search and detect the proxy server. If the customer uses a proxy server the iCAS supports two types of proxy servers. It supports Non-Authenticating proxy server and NTLM Authenticating proxy server. If the customer uses a proxy server, they must enter the proxy server name/ip address and the port.
Chapter 3: Using the iCAS When the customer receives the connection key and iCAS start screen URL (via email, telephone, chat, etc.) he/she is ready to begin his/her side of the connection.
Chapter 3: Using the iCAS l On the status display of the target system, right-click and select Disconnect and Remove from ACL. HP Remote Device Access 8.
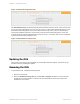
Chapter 4: iCAS Configuration The customer can restrict and control HP's use of iCAS to only designated systems to meet security needs by clicking the Access Control tab. Figure 4.1 Access Control Tab Configure Proxy Servers We use the HTTP Connect method to jump through the proxy server, requesting port 80. Many proxy servers are configured by default to forbid a CONNECT to port 80. The iCAS will return a "403 Forbidden" error from the proxy.
Chapter 4: iCAS Configuration Figure 4.2 Log Tab View Active Pipes The customer can monitor the traffic from your iRAP via the Active Pipes tab on the iCAS. Figure 4.3 Active Pipes Tab HP Remote Device Access 8.
Glossary Glossary Connection A generic term indicating peer-to-peer communications, over which sessions, tunnels, and pipes are carried. Connection Key An eight character code used as authentication token allowing the customer to connect to the midway server. iCAS "Instant CAS" is a lightweight connection tool the customer installs on his/her desktop as a browser plugin. iRAP "Instant RAP" is a connection tool for the support agent which communicates with the iCAS and is implemented as browser plugin.