
HP RDX DL Server module installation instructions (5697-2006, August 2012)

HP RDX Removable Disk
Backup System DL Server Module
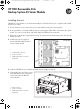
Installing the unit
HP RDX DL Server Module is an internal assembly for a Proliant DL server. It is supplied with a USB
and a power cable.
1. Power down the server, remove the power cord and then remove the access panel.
2. If an optical drive is already installed, remove it, leaving the SATA cable connected to the system
board. You can re-use the drive and cable with the HP RDX DL Server Module.
3.
Remove the optical drive cage from the server, as instructed in the HP ProLiant Server User Guide.
Retain the screws.
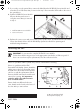
4. Install and route the supplied
power and USB cables from the
server’s system board.
1 internal USB connector
2 power connector
3 SATA optical drive connector
(optional)
5. Slide the HP RDX DL Server Module partially into the empty server bay.
6. Connect the other end of the power
and USB cables to the connectors
on the rear of the HP RDX DL
Server Module.
1 USB connector
2 power connector
3 SATA optical drive connector
(optional)
DL380 G8
5697-2006 RDX DL Storage Module Flyer front.pdf 1 27/06/2012 12:10