
HP ProLiant XL220a Gen8 v2 Maintenance and Service Guide


Removal and replacement procedures 42
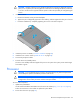
CAUTION: Heatsink retaining screws should be tightened or loosened in diagonally opposite
pairs (in an "X" pattern). Do not overtighten the screws as this can damage the board, connectors,
or screws. Use the wrench supplied with the system to reduce the possibility of overtightening the
screws.
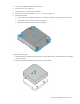
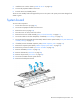
3. Install the heatsink:
a. Position the heatsink on the processor backplate.
b. Tighten one pair of diagonally opposite screws halfway, and then tighten the other pair of screws.
c. Finish the installation by completely tightening the screws in the same sequence.
4. Install the processor air baffle ("Processor air baffle" on page 28).
5. Install the server into the chassis ("Install the server" on page 26).
6. Connect the peripheral cables.
7. Press the Power On/Standby button.
The server exits standby mode and applies full power to the system. The system power LED changes
from amber to green.
Processor
CAUTION: To avoid damage to the processor and system board, only authorized personnel
should attempt to replace or install the processor in this server.
CAUTION: To prevent possible server malfunction and damage to the equipment, multiprocessor
configurations must contain processors with the same part number.
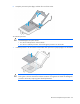
To remove the component:
1. Update the system ROM.
Locate and download the latest ROM version from the HP website (http://www.hp.com/support).
Follow the instructions on the website to update the system ROM.
2. Power down the server (on page 25).