
HP Apollo a6000 Chassis Quick Setup Instructions
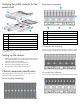

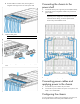

b. Slide the cables toward the center, allowing them to
straighten and hang from the rear of the power shelf.
7. Install the cable guard.
NOTE: Cables are removed for clarity.
8. Install the power supply vent cover to protect the power supply
vents.
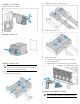
Connecting the chassis to the
power shelf
1. Connect the chassis power cage to the power shelf (blue cables).
2. Connect the chassis management module to the power shelf
(green cables).
NOTE: The cable configuration might appear different,
depending on the configuration of components. For more
information about cabling, see the HP Apollo a6000
Chassis Setup and Installation Guide.
Cable length is determined by the configuration of components.
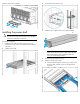
Connecting power cables and
applying power to the chassis
1. Connect the DC power cable to the power shelf.
2. Connect the AC power cables to the power source (UPS or wall
outlet) or to an installed PDU.
Configuring the chassis
For more information on setting up and configuring your system, see
the HP Apollo a6000 Chassis Setup and Installation Guide.