
HP Apollo a6000 Chassis Quick Setup Instructions


Install the component as indicated.
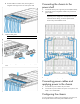
Installing the power shelf
CAUTION: To prevent damage to the component, power
down the chassis and disconnect all power cords before
removing or installing the component.
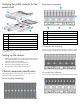
To install the component:
1. Install the power shelf rack rails into the rack. For more
information, see the HP XL Power Shelf Rack Rail Installation
Instructions.
2. Install the power shelf.
3. Secure the power shelf to the rack.
4. Install the power supplies into the power shelf, if needed.
NOTE: If additional clearance is required to install power
cables, loosen the thumb screw on either side of the shelf
and slide the shelf out while installing the cables. Use
caution to avoid bending the shelf.
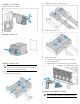
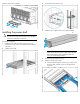
5. Remove the power supply vent cover.
6. Install the 12V DC power cables.
a. Insert the cable through the wide opening on either end of
the power shelf, and then connect it to the appropriate
connector.