
HP Apollo a6000 Chassis Quick Setup Instructions

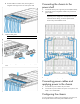

Installing the chassis into a rack
To install the chassis into a rack, see the HP Apollo a6000 Chassis
Setup and Installation Guide on the HP website
(http://www.hp.com/go/Apollo_6000/docs). For more information,
see the instructions included with the rail kit.
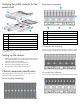
Configuration guidelines
To meet thermal requirements, always do the following:
• Populate empty bays with a blank.
• Populate all five fan bays with a fan.
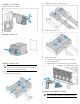
Installing the front components
CAUTION: To prevent improper cooling and thermal
damage, do not operate the server tray or the enclosure
unless all drive and device bays are populated with either
a component or a blank.
Install all server trays into each chassis.
Installing a server tray blank
CAUTION: To prevent improper cooling and thermal
damage, do not operate the chassis unless all bays are
populated with a component or a blank.
Install the component as indicated.
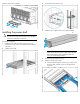
Installing a server tray
1. Prepare the server tray for installation.
2. Install the server tray. When seated properly, the server tray will
be flush with the front of the chassis and the release lever will
close completely without resistance.
Installing the rear components
CAUTION: To prevent improper cooling and thermal
damage, do not operate the enclosure unless all bays are
populated with a component or a blank.