
HP Graphics Server Blade XenServer GPU Pass-through Quick Start

Solution Quick Start Guide | HP Graphics Server Blade XenServer GPU Pass-through Quick Start
to a session using an end client display configuration that is not supported or that the client cannot configure, the
session will look like its doing something for a few seconds and then disappear with nothing happening
Known issue - Systems may lose network configuration or console screens may be blank after installing Citrix
XenServer 6.1 Hotfix XS61E030 or installing or upgrading to Citrix XenServer 6.2 if not at system
BIOS version 9/20/2013 or newer. Following is link to document:
http://h20564.www2.hp.com/portal/site/hpsc/public/kb/docDisplay/?docId=emr_na-c04013759
Known issue - XenServer 6.2 (Pre SP1) virtual machines (VMs) with NVidia GPUs passed-through, that do not have
any NVidia GPU drivers installed can cause the XenServer RDP console to get locked at 640x480 resolution and 16-
bit color mode. Hotfix XS62E010 fixes this issue: Following is link to document:
http://support.citrix.com/article/CTX139643
Setting up XenServer and HDX 3D Pro for Pass-Through GPU
Configuration steps for XenDesktop 7 / XenServer 6.2
1. Update the WS460c Graphics Server Blade with the latest HP SPP firmware by booting to the SPP DVD
You can obtain the latest SPP at: http://www.hp.com/go/spp
2. Insure the System BIOS level is at least 9/20/2013
You can obtain the required System BIOS at:
ftp://ftp.hp.com/pub/softlib2/software1/pubsw-windows/p1326513305/v92429
3. Setup system BIOS for installation
a. Boot to the HP RBSU (BIOS configuration utility) by pressing F9 during boot
b. Go to and select “System Default Options” > “Restore Default Options” and select to restore
c. After reset boot back into HP RBSU (BIOS configuration utility) by pressing F9 during boot
d. Set video mode to “SETUP”
i. Select System Options
ii. Select Remote Console Mode
iii. Set to “SETUP” mode
e. Set blade to static high performance mode
i. Select Power Management Options > HP Power Profile
ii. Select and enable “Maximum performance”
4. Install XenServer 6
5. Create or Import new virtual machine and XenServer tools
6. Configure and update operating system to your specifications
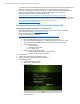
7. Install XenDesktop Agent
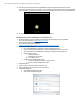
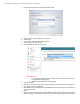
a. Mount the XenDesktop 7 ISO image
b. Double click on “AutoSelect.exe”/
c. Following appears
d. Click “Start” Button