
HP Graphics Server Blade Microsoft RemoteFX vGPU Quick Start

Technical white paper | HP Hardware Accelerated Graphics for Desktop Virtualization
4
Install and Configure RemoteFX vGPU on Graphics Server Blade
Configure server for installation
Table 5. HP WS460c Gen8 Server and infrastructure firmware recommended minimum revisions
Components
Version
HP Onboard Administrator
4.01
HP Virtual Connect
4.10
HP WS460c G6 System ROM
12/2/11
HP WS460c Gen8 System ROM
9/20/13 **Required bug fixes**
HP Integrated Lights-Out 2 (G6)
2.15 **Required bug fixes**
HP Integrated Lights-Out 4 (Gen8)
1.2
Installation Procedure
1. Update the WS460c Graphics Server Blade with the latest HP SPP firmware by booting to the SPP DVD
You can obtain the latest SPP at: http://www.hp.com/go/spp
2. Insure the System BIOS level is at least 9/20/2013
You can obtain the required System BIOS at:
ftp://ftp.hp.com/pub/softlib2/software1/pubsw-windows/p1326513305/v92429
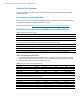
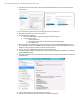
3. Setup system BIOS for installation
a. Boot to the HP RBSU (BIOS configuration utility) by pressing F9 during boot
b. Go to and select “System Default Options” > “Restore Default Options” and select to restore
c. After reset boot back into HP RBSU (BIOS configuration utility) by pressing F9 during boot
d. Set video mode to “SETUP”
i. Select System Options
ii. Select Remote Console Mode
iii. Set to “SETUP” mode
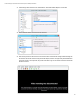
e. Set blade to static high performance mode
i. Select Power Management Options > HP Power Profile
ii. Select and enable “Maximum performance.”
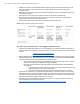
4. If installing 2012 (Not 2012 R2), due to issues noted above, it is recommended to disconnect GPU until windows is
installed and patched with all Windows updates. If installing 2012 R2, ignore this step
5. Install Server 2012/2012 R2 and install latest HP drivers and Windows updates
6. If you unplugged your GPU for 2012 install, plug it back in
7. Download the latest NVIDIA Server 2012 driver from the NVIDIA web page at:
http://www.nvidia.com/Download/index.aspx?lang=en-us
8. Install NVIDIA driver
9. Reboot
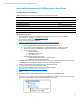
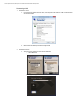
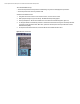
10. Go to device manager and under “Display Adapters” you should see the new NVIDA card listed.
IMPORTANT NOTE – In “SETUP” mode is it normal for the NIVIDA card to be “banged” out with a yellow exclamation
point next to it. Windows does not support two different types for video cards.