
HP ProLiant WS460c G6 Workstation Blade with WS460c Graphics Expansion Blade Maintenance and Service Guide


Removal and replacement procedures 66
9.
Press the Esc key to close the menu.
10. Press the Esc key to exit RBSU.
11. Press the F10 key to confirm exiting RBSU. The workstation blade automatically reboots.
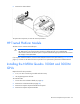
PCI Express graphics board
For detailed installation steps, see the server-specific user documentation.
To install the PCIe graphics board:
1. Power down the server ("Power down the workstation blade" on page 26).
2. Extend or remove the server from the rack.
3. Remove the access panel ("Access panel" on page 28).
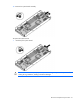
4. Remove the PCIe x16 riser board assembly.
5. Install the graphics board in the x16 slot of the PCIe riser board assembly.
6. Install the PCIe x16 riser board assembly into the server.
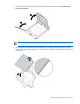
7. Connect the power cable:
a. Locate the 2x3 power cable wired to the power supply.
b. Connect the 2x3 power cable to the graphics board.
8. Install the access panel ("Access panel" on page 28).
9. Install the server into the rack.
10. Power up the server.
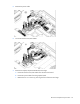
Battery replacement
If the workstation blade no longer automatically displays the correct date and time, you may need to replace
the battery that provides power to the real-time clock. Under normal use, battery life is 5 to 10 years.
WARNING: The computer contains an internal lithium manganese dioxide, a vanadium
pentoxide, or an alkaline battery pack. A risk of fire and burns exists if the battery pack is not
properly handled. To reduce the risk of personal injury:
• Do not attempt to recharge the battery.
• Do not expose the battery to temperatures higher than 60°C (140°F).
• Do not disassemble, crush, puncture, short external contacts, or dispose of in fire or water.
• Replace only with the spare designated for this product.
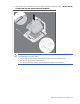
Before replacing a battery, you must remove any previously installed WS460c Graphics Expansion Blade
access panel and the blade.
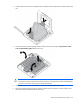
To remove the component:
1. Power down the workstation blade (on page 26).
2. Remove the workstation blade (on page 28).
3. Remove the access panel ("Access panel" on page 28).
4. Identify the battery location ("System board components" on page 87).