
HP ProLiant SL4500 Series Chassis Maintenance and Service Guide

Removal and replacement procedures 36
Removal and replacement procedures
Required tools
You need the following items for some procedures:
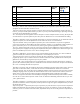
• T-10/T-15 Torx screwdriver (provided inside the node)
• HP Insight Diagnostics software ("HP Insight Diagnostics" on page 75)
Preparation procedures
To access some components and perform certain service procedures, you must perform one or more of the
following procedures:
• Power down the nodes ("Power down the node" on page 36).
If you must remove the chassis from a rack or a non-hot-plug component from the chassis or node, then
you must power down the nodes. If only one node needs to be serviced, you only need to power down
that node.
If you are going to service the management module, you must power down all nodes in the chassis.
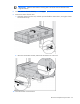
• Remove the chassis from the rack (on page 38).
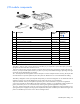
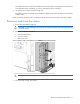
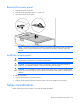
• Remove the nodes from the chassis ("Remove a node from the chassis" on page 37).
If the rack environment, cabling configuration, or the chassis location in the rack creates unstable
conditions, then remove the node from the chassis.
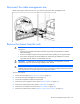
• Disconnect the cable management arm (on page 38).
• Remove the access panel (on page 40).
• Install the access panel (on page 40).
Power down the node
Before powering down the node for any upgrade or maintenance procedures, perform a backup of critical
server data and programs.
IMPORTANT: When the node is in standby mode, auxiliary power is still being provided to the
system.
To power down the node, use one of the following methods:
• Press and release the Power On/Standby button.
This method initiates a controlled shutdown of applications and the OS before the node enters standby
mode.
• Press and hold the Power On/Standby button for more than 4 seconds to force the node to enter
standby mode.