
Open Source Object Storage for Unstructured Data: Ceph on HP ProLiant SL4540 Gen8 Servers

Table Of Contents
- Executive summary
- Introduction
- Overview
- Solution components
- Workload testing
- Configuration guidance
- Bill of materials
- Summary
- Appendix A: Sample Reference Ceph Configuration File
- Appendix B: Sample Reference Pool Configuration
- Appendix C: Syntactical Conventions for command samples
- Appendix D: Server Preparation
- Appendix E: Cluster Installation
- Naming Conventions
- Ceph Deploy Setup
- Ceph Node Setup
- Create a Cluster
- Add Object Gateways
- Apache/FastCGI W/100-Continue
- Configure Apache/FastCGI
- Enable SSL
- Install Ceph Object Gateway
- Add gateway configuration to Ceph
- Redeploy Ceph Configuration
- Create Data Directory
- Create Gateway Configuration
- Enable the Configuration
- Add Ceph Object Gateway Script
- Generate Keyring and Key for the Gateway
- Restart Services and Start the Gateway
- Create a Gateway User
- Appendix F: Newer Ceph Features
- Appendix G: Helpful Commands
- Appendix H: Workload Tool Detail
- Glossary
- For more information
Reference Architecture | Product, solution, or service
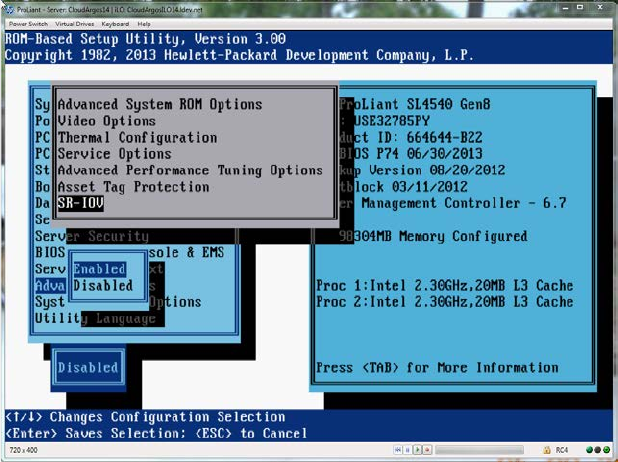
You should observe the dark blue box change to indicate “Enabled”. Escape twice and then press ‘F10’ to save your changes
and exit the utility.
Configuring a Mirrored Boot Device
While not required, mirroring your boot device is a good practice. For this reference architecture we created two partitions
on each drive, one for the root file system and one for swap. We then mirrored each pair of partitions.
During Ubuntu installation, when you arrive at the step to partition your disks, sleet the “Manual” partition method. Follow
these steps to create the necessary partitions.
1) Select the first of your system drives and confirm “Create a new empty partition table on this device?”. Repeat for
the second system drive.
2) Select “Free Space” on the first drive and then “Create a new partition”.
3) For this reference architecture, since we have 48GB of memory on the system, we chose to make our swap
partition 96GB following the rule of thumb in doubling the memory size. Enter 96GB as you size and then select
“Primary” and “Beginning”.
4) Select “Use as:” and change to “physical volume for RAID”, then select “Done setting up partition”.
5) For the root file system, again choose “Free Space” on the same device and “Create a new partition”.
6) Use the remainder of the available capacity on the drive. Select “Continue” and then “Primary”.
7) Select “Use as:” and again, change to “physical volume for RAID”. In this case, for the root file system select the
“Bootable flag:” and change the value to “on”. Then select “Done setting up partition”.
8) Now follow steps 2 through 7 again for the second drive.
The next step is to mirror the pairs of partitions just created for the root file system and swap partition. Go back to the main
“Partition Disks” page for this.
1) Select “Configure Software RAID” and “yes” to write the changes to disk.
2) Select “Create MD device” and then select “RAID1” for mirroring.
3) For “number of active devices”, enter 2 and then 0 for the number of spare devices.
4) The next step is selecting which partitions to mirror. For the swap partition, select sda1 and sdb1 then “Continue”
to go to the next step.
5) Repeat steps 2 through 4 to mirror the root file system partitions, this time selecting sda2 and sdb2.
6) Now select “Finish”.
You are now ready to format your mirrored partitions.
1) Under “RAID1 device #0”, select #1.
2) Select “Use as:”, change the value to “swap area”, and then “Done setting up partition”.
3) Under “RAID1 device #1”, select #1.
4) Select “Use as:” and change the value to “Ext4 journaling file system”.
5) Now select “Mount Point” and choose “/ - the root file system” and then “Done setting up partition”.
6) Select “Finish partitioning and write changes to disk”.
In our case we then confirmed that we wanted to boot in the event that the RAID partition was in a degraded state, and
proceeded with the rest of the OS installation.
37