
HP ProLiant SL250s Gen8 Server User Guide


Hardware options installation 51
5.
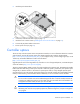
Install the quick-release drive.
6. If removed, install the front GPU cage (on page 17).
7. Install the server into the chassis ("Installing the server into the chassis" on page 31).
8. Connect all peripheral cables to the server.
9. Power up the server (on page 15).
Controller options
The server ships with HP Dynamic Smart Array B320i Controller. For more information about the controller
and its features, see the HP Dynamic Smart Array RAID Controller User Guide on the HP website
(http://www.hp.com/support/DSA_RAID_UG_en). To configure arrays, see the Configuring Arrays on HP
Smart Array Controllers Reference Guide on the HP website
(http://www.hp.com/support/CASAC_RG_en).
Upgrade options exist for the integrated array controller. For a list of supported options, see the QuickSpecs
on the HP website (http://www.hp.com/support).
The server supports FBWC. FBWC consists of a cache module and a capacitor pack. The DDR cache module
buffers and stores data being written by the controller. When the system is powered on, the capacitor pack
charges fully in about 5 minutes. In the event of a system power failure, a fully charged capacitor pack
provides power for up to 80 seconds. During that interval, the controller transfers the cached data from DDR
memory to flash memory, where the data remains indefinitely or until a controller retrieves the data.
CAUTION: The cache module connector does not use the industry-standard DDR3 mini-DIMMs.
Do not use the controller with cache modules designed for other controller models, because the
controller can malfunction and you can lose data. Also, do not transfer this cache module to an
unsupported controller model, because you can lose data.
CAUTION: To prevent a server malfunction or damage to the equipment, do not add or remove
the battery pack while an array capacity expansion, RAID level migration, or stripe size migration
is in progress.